MLK HyperDocs

The HyperDoc community has been very busy lately creating wonderful resources for teaching about Martin Luther King. I thought I would gather a few together in case you’d like to slip in an extra lesson this week or next. Enjoy!

This slideshow requires JavaScript.


What Will You Create Today?

The biggest obstacle teachers face when trying to integrate technology is time. There aren’t very many opportunities during the day to explore new tools, think of ways to use them with the curriculum, or actually sit down to write a comprehensive lesson plan. Plus, the implementation of Standard V just adds to the already existing high levels of stress. Fortunately, higher levels of technology integration promote student choice, which means less planning on the part of the teacher. Over the summer, I worked on some computer lab posters that will help guide students in choosing the right tool for their project, and support teachers in their efforts for easier ways to integrate. I chose the theme of a graphic novel (created using Comic Life) to bring a little adventure into the computer lab. The first poster is attached to the door of the lab and asks, “What will you create today?” This represents the cover of the graphic novel. When they enter, each page of the novel gives them ideas and tools to use to accomplish their task. I encourage all teachers to bring their mobile devices to the lab each week, as adding the component of a camera adds to the diversity of projects students have as options. 

This slideshow requires JavaScript.

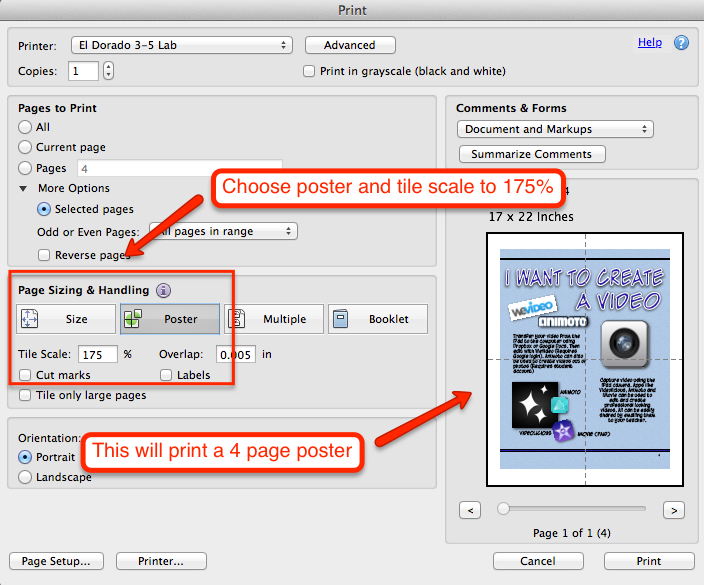
Many teachers may find this amount of freedom somewhat daunting, especially if they are unfamiliar with how to use the software, web tool or app. This provides the perfect opportunity to bring collaboration into your lessons. Allow students to work together to figure out how the tools work, and then let them teach the rest of the class. You can also utilize a QR code tutorial section where students can view videos for quick instructions. I’ve included a link below to the PDF version of the posters. There are some that are very NEISD specific, but hopefully they will inspire you to create more personalized versions for your own students. I’ve also included directions for printing them poster size.

printing poster

Tool of the Month: Board Builder

images

The Discovery Education Network has long been a favorite source for interactive content to support classroom instruction. Most teachers are familiar with their vast collection of streaming videos, but they also offer additional services designed to accelerate student achievement. One of the most recent additions is Board Builder, a fun and easy way for students to create digital content for all subject areas. This tool is very similar to other web based poster creators such as Glogster or Smore, but differs in that students can add content directly from the Discovery Education media library. They can also upload content they have created such as audio, images, video and attachments from their computer.

NEISD has purchased a subscription to Discovery Education for all students and teachers. Susan Reeves, Educational Specialist, Digital Age Learning for the Education Service Center, Region 20 in San Antonio, has created 2 videos to help get you started:

DEN Team member Jeanette Edelstein created this list of 50 Ways to Use Board Builder that includes links to actual boards. These are great examples that can help you visualize using this tool. Click here for a complete list of resources to help you navigate through the Discovery Education site.

50 Ways to Use Board Builder by lmoore4


Standard V Lesson Examples


Beginning with the 2013-2014 school year, NEISD teachers will be required to submit 1 student product that was created using technology. This initiative supports the Standard V requirements as outlined by SBEC.

My El Dorado peeps have been very busy planning with me and wanted to take this opportunity to share some of the projects they will be doing with their students. Many of these app/web tools are cross-curricular and can be applied to different TEKS or units of study. Please contact me if you have an idea for a lesson and need a similar task card to use with your students.

  • Kinder Language Arts K.6A identify elements of a story including setting, character and key events: Facetalk Retelling
  • 1st Grade Math 1.3 The student applies mathematical process standards to develop and use strategies for whole number addition and subtraction computations in order to solve problems: Farmyard Math
  • 1st Grade Language Arts 1.9 A Describe the plot (problem and solution) and retell a story’s beginning, middle, and end with attention to the sequence of events:  BME Summaries
  • 2nd Grade Science 2.5D Combine materials that when put together can do things that they cannot do by themselves such as building a tower or a bridge and justify the selection of those materials based on their physical properties: Videolicious Structures Project
  • 2nd Grade Science 2.5B  The student knows that matter has physical properties and those properties determine how it is described, classified, changed, and used. Matter and Energy Digital Story
  • 3rd Grade Reading SE 3.16 Students use comprehension skills to analyze how words, images, graphics, and sounds work together in various forms to impact meaning.  Students will continue to apply earlier standards with greater depth in increasingly more complex texts: Big 6 Research Project-PDF, Big 6 Research Project-Word 2013
  • 3rd Grade Math 3.11B: The student directly compares the attributes of length, area, weight/mass, and capacity, and uses comparative language to solve problems and answer questions. Perimeter Party
  • 4th Grade History 4.3 The student understands the importance of the Texas Revolution, the Republic of Texas, and the annexation of Texas to the United States: Google Tour Builder
  • 5th Grade Science 5.8 Students will understand that weather represents the short term conditions of the atmosphere by producing a video that explains weather patterns of a specific region over a 3 week period: Videolicious Weather Project


November Themed Lessons

(If you are viewing this post from within NEISD, make sure to override Lightspeed so you can see the above video from YouTube)

It’s a new month, which means a new holiday, which means new themed technology lessons. Of course, I have to begin by sharing a Thanksgiving Google Doodle from last year. (Remember that you have to override Lightspeed to view the video from within the district.) The following list contains free sites and apps that you can use in the classroom or computer lab. My favorite lesson you should try is the Thanksgiving Timeline virtual field trip using Google Earth. I taught this a few times last year and it will take at least 2 lab visits to complete.  It’s well worth the time investment!

Digital Vocabulary Activities for Upper Elementary

As part of my “Anchor Activities” series, here are a few digital vocabulary ideas that students can complete during SSR time or in Math/Literacy stations. Have students generate a list of vocabulary words they are unfamiliar with (or assign them specific words from your Math or Science word walls) and allow them to choose from the following activities:

I’ve made some examples of each using the word “condensation”

There are a variety of online vocabulary resources for support in defining and explaining concepts:

A Thanksgiving Timeline Via Google Earth

The following activity takes some VERY cool interactive websites and combines them with my absolute favorite web tool, Google Earth. At the bottom of this post is the KMZ file I created along with a printable copy of directions. Enjoy!!!

To access the Google Earth tour:

  • Students login to Active Directory and open Google Earth
  • Go to File>Open and navigate to the Student Shared Drive
  • Click on the KMZ file named A Thanksgiving Timeline (teachers need to save the KMZ file to the student shared drive prior to teaching the lesson.)
  • You will see the tour on the left side of the screen. There are 7 place marks total with information and links to online activities.

  • Double click on the red letter in the left pane to advance to each location. Double click on the red letter in the center to view the content within the placemark.

  • Advance through each placemark while completing each interactive until students reach the final destination where they describe family customs and traditions celebrated by their own families.
  • Students can document their learning by filling out a timeline graphic organizer or they can directly comment inside each placemark by right clicking and choosing properties. This will open the placemark for editing purposes. When complete, simply right click on the Thanksgiving Timeline folder located in the left panel and choose Save As.

The following links are possible extension activities:

A Thanksgiving Timeline KMZ (Google Earth File)

A Thanksgiving Timeline Directions

Free Digital Timeline Maker

A Thanksgiving Timeline Recording Sheet