Edmodo Training is now on Atomic Learning

What is Edmodo?

Edmodo is a social networking site for teachers and students – and it’s so much more! This free resource allows teachers and students a safe environment to communicate, collaborate, and have fun. This online training series will show users how to sign up for Edmodo and how to set up their account, and will also demonstrate how to use the many features, such as posting assignments and quizzes, populating a library of content, and even awarding recognition to students.
  • The following tutorials are all located in Atomic Learning. You must have a membership to view all titles. NEISD employees can login with your full NEISD email as your username and your 6 digit employee number as your password.

Tutorial Number Availability Status Tutorial Title Key # Length
1. preview Signing up for Edmodo 91452 0:16 Add to Favorites
2. preview Creating groups 91453 0:36 Add to Favorites
3. preview Creating your profile 91454 1:01 Add to Favorites
4. preview Adding content to the library 91455 0:43 Add to Favorites

Tutorial Number Availability Status Tutorial Title Key # Length
1. preview More library features 91456 1:36 Add to Favorites
2. preview Inviting group members 91457 0:25 Add to Favorites

Tutorial Number Availability Status Tutorial Title Key # Length
1. preview Posting notes 91458 1:30 Add to Favorites
2. preview Posting alerts 91459 0:36 Add to Favorites
3. preview Posting assignments 91460 0:35 Add to Favorites
4. preview Posting quizzes 91461 1:10 Add to Favorites
5. preview Posting polls 91462 0:19 Add to Favorites

Tutorial Number Availability Status Tutorial Title Key # Length
1. preview Using the gradebook 91463 0:43 Add to Favorites
2. preview Notifications 91464 0:32 Add to Favorites
3. preview Awarding badges 91465 0:54 Add to Favorites
Tutorial series by Heather Slee
Edmodo is a product of Edmodo, Inc.

When I Grow Up, I Want to be Lisa

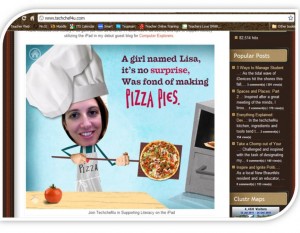
So, my tech tip this week is someone else’s blog…The Fabulous Lisa Johnson, NEISD ITS.  Yes, it’s OK if you say her blog is better than mine.  It is.  This is the first place I come to when I need a new and innovative technology integration idea.  I have no idea how she finds the time to do what she does.  I’ve decided she doesn’t sleep at night.  Lisa is a master of the iPad.  If you have any kind of iDevice, personal or professional, you will want to bookmark this site: http://www.techchef4u.com/  Put everything down right now and check it out!

Using More Than One App at a Time

While my husband was watching football on a Saturday afternoon (ugh), I decided to play around with this new app I found.  It’s not free ($4.99), but it’s crazy cool.  Corkulous is a great app for allowing students to explain Math, Science, or any other concepts they are learning in the classroom.  It allows you to upload images, create post-it notes to explain information and works great with other apps such as Doodle Buddy if you want to add personal drawings.  Here is an example I used to explain the water cycle:


The app also allows you to create a template as well as beginning a new project from scratch.  I uploaded some images in dropbox that I knew I wanted to include in this explanation.  When I finished my corkboard, I saved the image in My Photos on the iPad.  Then I opened Doodle Buddy, inserted my corkboard, and drew the arrows to represent the order of each process.  The last step was to save the image again and email it to myself.  It sounds tricky at first, but once you (and your kids) get the hang of it, the sky is the limit!

Blogging in Teacher Web!

 To add a Blog in Teacher Web:

  •  Under the My Applications tab, click on Maintain Blog.
  • Click on the Add New Blog link.
  • Enter in the Overall Blog Title and Posting Title.
  • Enter in your first thought, question or posting in the text area.
  • To password protect the Blog on the public site, enter in a password (optional). This field is limited to 20 characters.
  • Enter in a description of the Blog (optional). Comment Options:
    • Allow Comments – Select ‘Yes’ if you would like to allow people or students to comment on your Blog postings or ‘No’ if you do not.
    • Automatically Authorize Comments – To automatically authorize comments, select ‘Yes’. If you select ‘No’ to not automatically authorize comments, you would have to approve them first before they’re posted.
    • Email Comments – enter in an email address if you’d like to be notified via email of postings to the blog.
    • Show Comments – To display the posted comments, select ‘Yes’ or ‘No’ to not show comments.
    • Show User Email – Select ‘Yes’ to display the email address of the posted comment. If you do not want email addresses displayed of those who posted a comment on the front end, then select No.
  • Hit Next.
  • Enter in a Posting Title. You must add at least one posting in order for people to be able to post comments to your Blog.
  • Hit Save.
  • Images tab – to add an image to your blog, click on Maintain Blogs, then on the link under the Posts column. Click on the edit link next to the posting, then on the Images tab. Click Browse, select your image, hit Save.
  • Files tab – to add up to 3 files to your Blog for reference, click on the Files tab. Click on Browse, select your file, enter in a friendly file name and hit Save.


The Four Seasons App Task Card

I came across this adorable app called Four Seasons in the iTunes app store. ( I love it when I find something cute and it’s FREE!)  This app is perfect for a Science or Language Arts technology workstation. First, search the app store and download it on your iDevice.  It looks like this-

I have also included a task card for you to use. There are other free books as well as this one. You can access them on the last page of the book. Enjoy!

Task Card for Four Seasons App

Interactive Whiteboard Language Arts Tips From Scholastic

Building Language for Literacy
Make the connection between letters and sounds. (PreK–K)


Practical Tips:

Have students practice their rhyming skills with Reggie the Rhyming Rhino. Display the activity on Whiteboard and have different students choose the words that rhyme.
Nina the Naming Newt will help students identify places within their community and common items found in those places. This is a wonderful activity to use with a social studies unit about community. Display the activity on Whiteboard and have different students drag the correct items into the box.
All of these activities can be used for small group instruction, especially the “Leo the Letter-Loving Lobster” activity. Help a small group of students with letter recognition by displaying the activity on the Whiteboard and having students choose the letters that match the object. Students can also keep a word dictionary in a notebook and add the new words that they spelled.
Go to Building Language for Literacy
Go to Teacher’s Guide

Clifford Interactive Storybooks
Play with phonics to build stories, in English and Spanish. (PreK–2)

Practical Tips:

Use these activities during circle time or a morning meeting to have students practice reading together. Students will enjoy choosing the words to complete the story they’re reading.
If you have voting capabilities, invite students to vote for which word they want to use to complete the story.
Do a “picture walk.” Before reading the story or listening to the audio, talk about the elements in the illustration. Have students circle and label the elements before reading the page.
Go to Clifford Interactive Storybooks
Go to Teacher’s Guide

Clifford Learning Games
Practice letters, sounds, and sight words with the Big Red Dog. (PreK–2)

Practical Tips:

Practice letter recognition with the word match game. Activity can be completed as a whole class or with a small group of students who need extra practice. Have students take turns dragging the words into the box with the appropriate starting letter.
Make new words using the “Make a Word” game. Display the activity on Whiteboard when students enter the classroom and challenge each student to create a new word. Students will look forward to creating new words when they enter the classroom in the morning. The “Make a Word” game can also be used whole class to review vowel sounds and even rhyming words.
Go to Clifford Learning Games
Go to Teacher’s Guide

Scholastic Videos
Bring authors into your classroom and build excitement around books. (PreK–12)

Check out the vast video collection for:

Video Book Talks
Video Book Trailers
Author Read-Alouds
Practical Tips:

Get students excited about an author study by showing a short video of the author on the Whiteboard.
Inspire young writers to enjoy writing and to understand the writing process by introducing them to published authors. Start a mini-lesson on where writers get their ideas by playing one of the many videos included in the collection. Have students make a list of how published authors come up with their writing ideas. Videos can also be used for mini-lessons on editing, revision, character development, etc.
Use videos to inspire students to create their own author videos. After students view several author videos on the Whiteboard, have them brainstorm ideas and topics to include in their own author video. Students will not only think about themselves as writers, they will be inspired to write more.
Go to Scholastic Videos

Story Starters
Generate creative writing prompts and then write stories. (K–6)

Practical Tips:

This is a perfect activity for students to complete as a morning activity. Display “Story
Starters” on Whiteboard and assign one student each day to spin the wheel. Students can write their creative stories in their Writer’s Notebook.
Do you have an extra few minutes between classroom activities and need something to do? Display “Story Starters” on your Whiteboard and have a student spin the wheel. Give students time to start writing their stories. Students can finish their stories during the day or for homework.
Go to Story Starters
Go to Teacher’s Guide

Character Scrapbook
Create illustrated pages that analyze favorite characters from any book. (K–8)

Practical Tips:

Help students learn how to determine character traits of a character in a book. Use a class read-aloud to model on the Whiteboard how to complete the activity. Have students come up to the Whiteboard and write down what they know about a character. Once this activity is modeled, students can complete it independently in the computer lab or at a center.
Challenge students to critically think about characters in books you are reading in class. Complete the “Ten things I know about . . . ” page, and have students use their critical thinking skills to determine which character of the book fits the descriptions displayed on the board.
Go to Character Scrapbook
Go to Teacher’s Guide

Flashlight Readers
Interact with your favorite books through games, slide shows, and videos. (1–8)

Practical Tips:

Show students the importance of revision in the writing process. Use Kate DiCamillo’s
“Slide Show of Drafts” to discuss the revision process and allow students to connect to a published author. Play each draft slide and have students write down how Kate DiCamillo revised the draft. When finished, have students use the strategies learned to revise their own writing.
Video and audio clips can be displayed on the Whiteboard to introduce an author study or to pique students’ interest in a book they’re going to read.
Do your students need extra grammar practice? Use Charlotte’s Web “Pick-the-Perfect-Word Game” to practice identifying nouns, verbs, adjectives, and prefixes. Display the activity on Whiteboard and have students move the correct words into Charlotte’s web.
Go to Flashlight Readers
Go to Teacher’s Guide

Poetry Idea Engine
Write haikus, free verse, limericks, and more. (1–8)

Practical Tips:

Display the “Poetry Idea Engine” and choose a type of poetry to teach. Each one explains the definition of the poem to assist with teaching. Have students create different poems for each type by dragging words into the blanks. After learning about each type of poem, have students create their own in groups, pairs, or individually.
Leave the poetry machine up to use at a center. Students can create a poem on the board, then write one at the center.
Go to Poetry Idea Engine
Go to Teacher’s Guide

Scholastic News Top Story
Focus on main idea, topic sentences, and essay structure with timely subjects. (3–8)

Practical Tips:

Select Top News story at your class reading level (each top story is available with leveled versions for grade 3, 4, 5–6, and 7–8). Display on Whiteboard and ask students to read aloud. Use the editing functions on your Whiteboard to highlight main and supporting ideas and key vocabulary. This is good practice for reading comprehension test skills.
Display the most-recent Top News story on your Whiteboard for transition time as students arrive, submit homework, etc. Ask students to do a five-minute free write in their Writer’s Notebook of reactions, personal connections, or fictional versions of what happens next.
Go to Scholastic News Top Story
Go to Teacher’s Guide

Myths Brainstorming Machine
Choose the elements to create your own myth. (4–9)

Practical Tips:

Use the brainstorming tool to model brainstorming ideas to write a myth. Have students work through choosing a setting, monster, and god/goddess as a whole class. Then model how to use the outline to write the myth.
Use this brainstorming tool with students who are struggling for writing ideas. Display the “Myths Brainstorming Machine” and have struggling students choose in a small group which setting, monster, and god/goddess they would like to use in their story. Print out the idea outline to get them started writing.
Go to Myths Brainstorming Machine
Go to Teacher’s Guide

Creating Forms in Teacher Web

To create a form:

  • Click on Main Menu.
  • Click on the My Applications tab.
  • Click on Show Inactive Sections.
  • Turn forms on and go back to My Applications.
  • Click on Add Form under the Forms category.
  • Enter a Form Name in the field.
  • Enter Form Information (optional).
  • Enter a password for protected access (optional).
  • Enter a Start Date for when the form will appear on your site.
  • Enter an End Date for when the form will disappear from your site (optional).
  • Click Continue.


Questions:

  • Enter questions into the text fields.
  • Determine whether the question will be required or not by selecting the option Yes or No from the drop down menu under Required.
  • Under Answer Type, select either Short Answer, Medium Answer, Long Answer, True/False, Multiple Choice, Date Format, Email Address, File Upload or Information Only. File Upload allows visitors to upload files to your site.
  • Once you’ve entered in all of your questions, hit Save at the bottom of the page.
  • Your form address is indicated at the top of the Main Info page and can be copied and pasted anywhere on your site.


Limits Tab – To limit the number of submissions to your form, click on the Limits tab and enter in the maximum number. Hit Save.

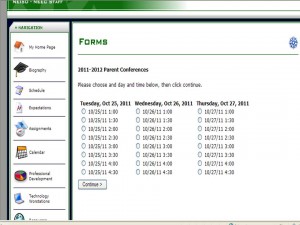
 Appointment Scheduler – gives you the ability to add appointment scheduling to any form i.e. Parent-Teacher Conferences, After-School Help sessions, Sports Physicals, or Drivers Ed Courses.

 To setup the Appointment Scheduler:

  • When you click on the Limits tab, you’ll see Advanced Feature. Click on the click here link.
  • The next screen will ask you to enter in an Off Site date. The system will NOT display your form after the Off Site date.
  • You can enter in different dates on when the form will accept appointment submissions in the Start Accepting and End Accepting fields. For instance, the form may be up longer than the allotted timeframe for appointment scheduling.
  • Select the appropriate days of the week for the appointments.
  • Hit Next
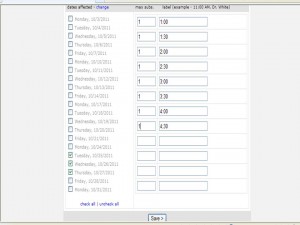
  • Select your date or dates.
  • Enter your max submissions per day.
  • Enter a “label” for each entry. Hit Save, enter more if needed.

Automatic time intervals for two hours, one hour, 30 minutes, and 15 minutes can easily be added by clicking on the links at the bottom of the page. Hit Save.

 Duplicating a Form:

When you duplicate a form, the dates and times of the appt. scheduling can be carried over to the new form if the dates are in the future. There is a checkbox to select to include dates when duplicating a form.

  • Click on Edit Form.
  • Click on the Duplicatelink.
  • Edit the New Form Name, if necessary.
  • Select the questions to be copied over to the new form.
  • Hit Duplicate.


To view the individual results of a form:

  • Click on Form Submissions.
  • Click on the View link.The option to Print All submissions is available on this screen as well as the ability to change the status en masse.
  • Each submission is listed with date and time details.
  • Click on the View link next to the submission of interest.
  • This area will list the answers to each question as well as the computer IP address.
  • You can print the submission by clicking on the Print Submission link at the top.
  • You can mark the submission as Keep as New or select Already Seen by clicking on the drop down menu. There is also an area to enter internal comments.
  • Hit Save.
  • If there is a typo or inappropriate content added to the form, you can edit the form submissions by clicking on the click here to edit these answers link in the upper left corner.

To view the group aggregates:

  • Click on Totals.
  • Choose the questions you want on the report. The report will aggregate the submissions to show the number of people with the same answers. By default, questions that ask for “free form text” are not selected below as they are not easily aggregated (although you can select them).
  • To view graphs with your data, select the checkbox for ‘Check this box to display Graphs with your data (where applicable)’.
  • Hit Display.

To Download the submission data:

  • Click on Form Submissions.
  • Click on the Download link.
  • Select the Questions (Answers) to download.
  • Select All, New, Completed, etc.
  • Select Show on Screen, if desired.
  • Select Include Submission Number with Download, optional.
  • Hit Download.
  • Click the preferred report format button – PDF or Excel. You can also highlight the text and then copy and paste the data into the application of your choice.


Adding contacts to GroupWise Messenger

http://oit.wvu.edu/groupwise/files/gwmwin204/7shortcut.png

  1. Login to GroupWise Messenger
  2. Click on Actions
  3. Add Folder for your Campus
  4. Click on Actions
  5. Add  Contact
  6. Click Advanced
  7. On the Department drop box choose Contains and type your campus name
  8. Click on the first name and hold down shift and click on the last name. Be sure all names are highlighted
  9. If you are only adding a few new people, type their name in first and last
  10. Click Add