To create a form:
- Click on Main Menu.
- Click on the My Applications tab.
- Click on Show Inactive Sections.
- Turn forms on and go back to My Applications.
- Click on Add Form under the Forms category.
- Enter a Form Name in the field.
- Enter Form Information (optional).
- Enter a password for protected access (optional).
- Enter a Start Date for when the form will appear on your site.
- Enter an End Date for when the form will disappear from your site (optional).
- Click Continue.
Questions:
- Enter questions into the text fields.
- Determine whether the question will be required or not by selecting the option Yes or No from the drop down menu under Required.
- Under Answer Type, select either Short Answer, Medium Answer, Long Answer, True/False, Multiple Choice, Date Format, Email Address, File Upload or Information Only. File Upload allows visitors to upload files to your site.
- Once you’ve entered in all of your questions, hit Save at the bottom of the page.
- Your form address is indicated at the top of the Main Info page and can be copied and pasted anywhere on your site.
Limits Tab – To limit the number of submissions to your form, click on the Limits tab and enter in the maximum number. Hit Save.
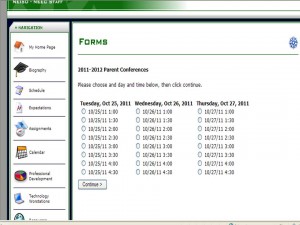
Appointment Scheduler – gives you the ability to add appointment scheduling to any form i.e. Parent-Teacher Conferences, After-School Help sessions, Sports Physicals, or Drivers Ed Courses.
To setup the Appointment Scheduler:
- When you click on the Limits tab, you’ll see Advanced Feature. Click on the click here link.
- The next screen will ask you to enter in an Off Site date. The system will NOT display your form after the Off Site date.
- You can enter in different dates on when the form will accept appointment submissions in the Start Accepting and End Accepting fields. For instance, the form may be up longer than the allotted timeframe for appointment scheduling.
- Select the appropriate days of the week for the appointments.
- Hit Next.
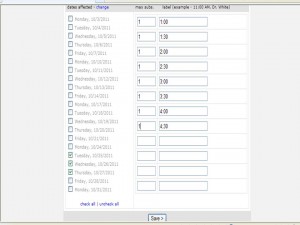
- Select your date or dates.
- Enter your max submissions per day.
- Enter a “label” for each entry. Hit Save, enter more if needed.
Automatic time intervals for two hours, one hour, 30 minutes, and 15 minutes can easily be added by clicking on the links at the bottom of the page. Hit Save.
Duplicating a Form:
When you duplicate a form, the dates and times of the appt. scheduling can be carried over to the new form if the dates are in the future. There is a checkbox to select to include dates when duplicating a form.
- Click on Edit Form.
- Click on the Duplicatelink.
- Edit the New Form Name, if necessary.
- Select the questions to be copied over to the new form.
- Hit Duplicate.
To view the individual results of a form:
- Click on Form Submissions.
- Click on the View link.The option to Print All submissions is available on this screen as well as the ability to change the status en masse.
- Each submission is listed with date and time details.
- Click on the View link next to the submission of interest.
- This area will list the answers to each question as well as the computer IP address.
- You can print the submission by clicking on the Print Submission link at the top.
- You can mark the submission as Keep as New or select Already Seen by clicking on the drop down menu. There is also an area to enter internal comments.
- Hit Save.
- If there is a typo or inappropriate content added to the form, you can edit the form submissions by clicking on the click here to edit these answers link in the upper left corner.
To view the group aggregates:
- Click on Totals.
- Choose the questions you want on the report. The report will aggregate the submissions to show the number of people with the same answers. By default, questions that ask for “free form text” are not selected below as they are not easily aggregated (although you can select them).
- To view graphs with your data, select the checkbox for ‘Check this box to display Graphs with your data (where applicable)’.
- Hit Display.
To Download the submission data:
- Click on Form Submissions.
- Click on the Download link.
- Select the Questions (Answers) to download.
- Select All, New, Completed, etc.
- Select Show on Screen, if desired.
- Select Include Submission Number with Download, optional.
- Hit Download.
- Click the preferred report format button – PDF or Excel. You can also highlight the text and then copy and paste the data into the application of your choice.


