Digital Storytelling on the iPad

There are many apps out there (paid and free) that are great for digital storytelling. I’ve written about several before, but I wanted to share a new one with you called Storehouse. Storehouse is a free, easy to use app that allows students to visually tell a story through video, images and text. They just recently added the ability to share on social media, embed a preview on a website, and add comments or ask the author questions. As with other storytelling apps I have showcased before, Storehouse can be cross-curricular for non-fiction projects such as explaining scientific concepts or retelling historical events. Below is a stunning collection of images and videos capturing the beginning of spring.

Interested in learning about hedgehogs? Check out this one:

For more ideas on digital storytelling using the iPad, visit my Book Creator Apps for the iPad page that includes examples of use and video tutorials.

App Flows Template via Graphite

I have been obsessed over the past few months with the concept of app-smashing, the process of using, or “smashing”, different apps together to complete tasks and create rich student products. Organizing the way in which I present an app smash to teachers is something I have been struggling with, so I was thrilled when I stumbled upon Graphite’s App Flow Template and lesson bank. Kelly Mendoza does an excellent job of comparing app flows and app smashing in her post on Graphite,

If you’re already using App Flows, our interactive lesson-planning template on Graphite, you might be curious how app smashing and App Flows compare. Both approaches move away from being singularly app- or tool-centric. Instead, both highlight how apps can be used in conjunction with one another to reach an objective or complete a task. However, it seems that app smashing centers on transforming student projects to be rich media creations, whereas an App Flow is a broader framework for instructional planning. App Flows include pedagogical insight, allowing you to focus on incorporating a variety of digital media tools, including subject-specific ones, throughout lesson. Both of these concepts truly encourage the seamless use of technology to meet chosen learning objectives. The possibilities are endless!

The image below shows how this framework is organized. The tool used in each part of the framework can be an app, web based tool, or just a simple discussion to clarify concepts. It truly demonstrates seamless integration and is a nice way for teachers that are uncomfortable using technology to experiment with a few tools at a time. Check out the flows that are already in the database and try creating one of your own.

app-flows-landing

Tool of the Month: Kidspiration 3

All NEISD computer labs have been replaced and are now running Kidspiration 3. This is an excellent cross-curricular program that allows for differentiation and does not require a large amount of prep time. Kidspiration 3 differs from version 2 in that it now provides a math component that includes virtual manipulatives. I’ve created some resources to help get you started. Hover over each tool to view an Atomic Learning video tutorial. Log in using your full NEISD email as your username and your 6 digit employee number as your password. For hundreds of already created lessons, visit Kidspiration Online Teacher Resources. Looking for more in-depth Kidspiration Support? Check out these pre-recorded free webinars on a variety of topics:

  • Keep Your Students Learning to the Last Bell with Kidspiration
  • Teaching STEM and 21st Century Skills with Kidspiration
  • Learn to Use Kidspiration Math Tools
  • Writing to a Prompt with Kidspiration
  • Individualizing Early Literacy Instruction with Kidspiration
  • Making Sense of Fractions with Kidspiration


Using Kidspiration Starter

Using Math Starter


Using Picture View 


Using Writing View

Using Teacher Menu

Bloggin’ at Bulverde Creek

Even though I’ve been knee deep in district laptop deployment and not able to support my campuses in person, I know exactly what the teachers and students are up to at Bulverde Creek Elementary, San Antonio, Texas. They have an awesome group of bloggers that are diligent about showcasing student work and providing their students with a global audience. Bulverde Creek teachers have an instinctual ability to integrate technology in an engaging and creative way. I wanted to take this opportunity to share some of their ideas with you. Please feel free to leave comments on their blogs in support of their efforts.

Natalie Davis – Mrs. Davis is a 5th grade teacher and a master at appsmashing. This year she implemented an “Any App Pass” where they can choose any app to demonstrate understanding. Check out Wyatt and Preston’s product that shows how to simplify fractions using video and Snapguide:

Check out How to Simplify Fraction’s by Bulverde Fifth on Snapguide.

Jill Corona and Jennifer Montemayor– are both Kinder teachers that regularly share online videos with their parents to support classroom instruction. They also post pictures of special days or events that happen on campus.

Amanda Morris is a fantastic music teacher that posts videos of student performances. Below you will find a percussion demonstration of a Jamaican folk song. Mrs. Morris also uses iPads for self-paced music stations. You can read about it and see examples by clicking here.

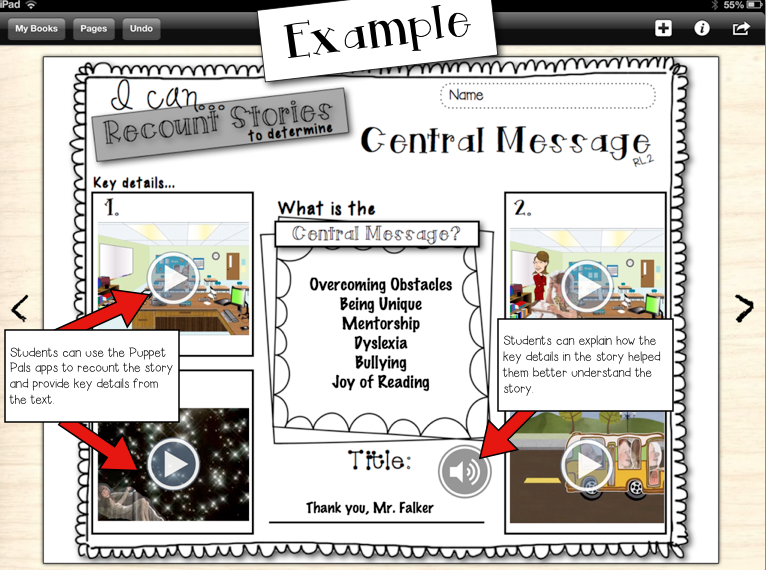
Kacie Germadnik, GT teacher at Bulverde Creek, is my personal go-to person for new technology ideas. She has a plethora of tools in her arsenal and uses them every week. One that caught my eye was the way she used Blendspace (formerly Edcanvas) to showcase a student collection of biographies made with Smore. It reminds me of those Russian nesting dolls… a tool, within a tool, within a tool. Here is Kacie’s description of the lesson: 

“Push PLAY to journey through the awesome Smore Fliers created by 5th grade Gifted and Talented kids.  These fliers were created to showcase the personal philosophies of these students through their development of I Believe statements, creating a Dream Team to inspire them to reach their goals, a Mandala that showcases their personal values and ideals, and a biography about how they might impact the world in the future.”

So, let’s review: Step 1- Students create biographies using Smore, Step 2-Teacher compiles all flyers using Blendspace, Step 3- Teachers shares student products with the world by embedding the Blendspace on her blog. Check out the example below.


Interactive Sites for Your SMARTboard

When creating Notebook files for teachers, I usually structure the lesson with the following 3 components: introduction, guided practice and checking for understanding. There are many sites that provide free content for each of these components. Study Jams! is a free site by Scholastic that provides interactive multimedia lessons to support Science and Math concepts. You can find over 200 topics and each works great on the SMARTboard. Click here to download an example Notebook lesson that supports area and perimeter.  Below is a slideshow of the class I will be presenting at the SMART User’s Conference in June of this year (more information will be provided later). Each page contains links to interactive sites that support the curriculum for that particular area. Many of the websites featured are free and easy to use. Some are more complex and require a user guide for site navigation. You can find links to video tutorials and user guides in the attachments tab of the Notebook file. Click here to download the complete presentation.

*Updated* Lab Lessons and Resources

Hover over each image to see a linked tutorial on how to use that program. Many of the resources also include integration ideas. This is a great place to go if you are unfamiliar with our district software, or just need some additional ideas to support your instruction. Please contact me if you would like to plan your next computer lab lesson.

*Updated*

Posted in Uncategorized

App-Smashtastic Retelling Project!

I recently stumbled upon one of the most creative app-smash projects I have ever seen from Davyhulme Primary School, United Kingdom. The students were focusing on retelling traditional tales, as well as looking at punctuating direct speech. Here is a description of the apptivity:

To help them develop this further, the children created a comic strip of a traditional tale, adding speech bubbles and by using the iPad were able to fill the speech bubbles with videos of the children acting as the characters. This really helped develop the children’s understanding of how to describe the reporting clause. They were able to see how everything the character says including any punctuation, goes inside the speech bubble, therefore inside the speech marks. It also showed how well the children understood the story if they could act in character.

You can read the entire post here. App-smashing is the process of using multiple apps to complete a final product. This particular example uses the iPad camera, Comic Life ($4.99), and Thinglink. The background contains images from the story The Three Little Pigs with the faces of the students superimposed on top, thus making the students the characters in the story. Notice how the students capture the emotion of the characters through facial expressions (my favorite part). Videos of students retelling the story are revealed as you hover your cursor over each speech bubble. I’m sure the energy and excitement during the creation of this product was insane. It makes me want to go back to the classroom! Thank you class 2A for sharing your masterpiece. For more information about app-smashing, check out Lisa Johnson’s post: App Synergy: The Art Form of App-Smashing.


App Smash Workflow for an Interactive Comic:

  1. Use the iPad camera to take pictures of the images in the book you are reading (In this case, The Three Little Pigs). Also take pictures of your students that you will superimpose over the images from your story.
  2. Use Stackr to layer and crop your images from step 1 and save to your camera roll.
  3. Use Comic Life or some other comic creator app of your choice and insert the images from your camera roll. Add speech bubbles as these will be the place markers for the student created videos.
  4. Save your image created in Comic Life, or other comic creator app, to your camera roll.
  5. Have students record video of themselves retelling important parts of the book. The script needs to match the images that you took earlier. These videos will also be saved in your camera roll.
  6. Open Thinglink and upload your comic book image.
  7. Add the video tags from your camera roll and place them in the speech bubbles.


Tool of the Month: Board Builder

images

The Discovery Education Network has long been a favorite source for interactive content to support classroom instruction. Most teachers are familiar with their vast collection of streaming videos, but they also offer additional services designed to accelerate student achievement. One of the most recent additions is Board Builder, a fun and easy way for students to create digital content for all subject areas. This tool is very similar to other web based poster creators such as Glogster or Smore, but differs in that students can add content directly from the Discovery Education media library. They can also upload content they have created such as audio, images, video and attachments from their computer.

NEISD has purchased a subscription to Discovery Education for all students and teachers. Susan Reeves, Educational Specialist, Digital Age Learning for the Education Service Center, Region 20 in San Antonio, has created 2 videos to help get you started:

DEN Team member Jeanette Edelstein created this list of 50 Ways to Use Board Builder that includes links to actual boards. These are great examples that can help you visualize using this tool. Click here for a complete list of resources to help you navigate through the Discovery Education site.

50 Ways to Use Board Builder by lmoore4


February Themed Technology Lessons


If you didn’t play the video above, stop reading right now and do it. This is probably the cutest Feb. doodle to date. Hopefully, you will find some time this month to step away from the test prep and infuse a little fun into your lesson plans. Here are a few lessons, ideas, and activities that will keep your students entertained as they learn new concepts. Check back often as I am still updating this list. Happy February!

NEISD Folio Resources

For the next 4 months, Technology Services will be distributing new laptops to all NEISD teachers and administrators. I will continue to post examples of classroom integration on my blog, however, I will not be available for face-to-face support. Below are a few resources to help you get acclimated to the new Active Directory environment. Please continue to email me if you have any questions. 

Click here to print Teacher Checklist


Standard V Lesson Examples


Beginning with the 2013-2014 school year, NEISD teachers will be required to submit 1 student product that was created using technology. This initiative supports the Standard V requirements as outlined by SBEC.

My El Dorado peeps have been very busy planning with me and wanted to take this opportunity to share some of the projects they will be doing with their students. Many of these app/web tools are cross-curricular and can be applied to different TEKS or units of study. Please contact me if you have an idea for a lesson and need a similar task card to use with your students.

  • Kinder Language Arts K.6A identify elements of a story including setting, character and key events: Facetalk Retelling
  • 1st Grade Math 1.3 The student applies mathematical process standards to develop and use strategies for whole number addition and subtraction computations in order to solve problems: Farmyard Math
  • 1st Grade Language Arts 1.9 A Describe the plot (problem and solution) and retell a story’s beginning, middle, and end with attention to the sequence of events:  BME Summaries
  • 2nd Grade Science 2.5D Combine materials that when put together can do things that they cannot do by themselves such as building a tower or a bridge and justify the selection of those materials based on their physical properties: Videolicious Structures Project
  • 2nd Grade Science 2.5B  The student knows that matter has physical properties and those properties determine how it is described, classified, changed, and used. Matter and Energy Digital Story
  • 3rd Grade Reading SE 3.16 Students use comprehension skills to analyze how words, images, graphics, and sounds work together in various forms to impact meaning.  Students will continue to apply earlier standards with greater depth in increasingly more complex texts: Big 6 Research Project-PDF, Big 6 Research Project-Word 2013
  • 3rd Grade Math 3.11B: The student directly compares the attributes of length, area, weight/mass, and capacity, and uses comparative language to solve problems and answer questions. Perimeter Party
  • 4th Grade History 4.3 The student understands the importance of the Texas Revolution, the Republic of Texas, and the annexation of Texas to the United States: Google Tour Builder
  • 5th Grade Science 5.8 Students will understand that weather represents the short term conditions of the atmosphere by producing a video that explains weather patterns of a specific region over a 3 week period: Videolicious Weather Project


Tool of the Month: Book Creator App

One of my favorite apps for the iPad is Book Creator. It costs $4.99 but they also have a free version that lets you create one free book. There isn’t a limit (as far as I can tell) as to how many pages your one free book can have, so it is possible to use your free book for several different projects. I stumbled upon a wonderful blog post from Tech With Jen where she describes how she uses graphic organizers as the background for student interactive reading journals. This one particular quote really stood out and made me think:

“When students have to write they spend a lot of cognitive energy on composing the message. Because of this, many students tend to choose to write what is easy rather than going deeper. Therefore, why not allow students to record their thinking using video, audio recording, and finding evidence by highlighting text.”

This is the perfect example of how technology can be used to enhance the learning process in a meaningful way. Using graphic organizers is a great way to bridge the gap between what is comfortable and trying something new. Below is a screenshot of one of Jen’s graphic organizers that includes video, audio and text. Notice that she used other video creation apps to summarize and retell events in a story.

Screen Shot 2013-09-10 at 10.09.01 PM

There are many free sources where you can find digital versions of graphic organizers:

The easiest way to get the graphic organizer into Book Creator would be to simply take a picture of the printed copy and upload as the background. If you really want to get creative, you could make your own graphic organizers in Pages or PowerPoint and then save as a jpeg. Dropbox or some other cloud storage utility will allow you to import to your camera roll. For more information on using Book Creator, visit their support page or view the video tutorial below.