One issue we see across the district is the loss of interactivity, meaning that you can still see the image of your desktop on the board but nothing happens when you touch the board. When teachers dock and undock their laptops from the docking station, sometimes it drops the driver running in your system tray. This driver is what makes the interactive part happen on your SMARTboard. If you memorize the following steps below, you can avoid this issue interrupting the flow of your lesson.
Step 1: Update your SMART Notebook Software (This is a one time thing)
Open the Software Center and install The SMART Learning Suite 19.0. You need to make sure there are no programs running in the background during the installation process. This includes Skype for Business (IM). Once installation is complete, restart your computer. After you login, you may see an additional pop up in the lower right corner asking you to update your firmware. YES!!!! Do this! Click on it and follow the prompts. If you keep getting an installation failed message, please submit a help desk ticket so the technician can remote into your computer and install it for you.
Step 2: Look for the SMART System Menu located in your system tray.
Step 3: Unplug and Plug
More than likely, there will be a red X on the Smart System Menu icon. Go over to the board and look underneath the pen tray. There are 2 cords. One is for power and the other connects your board to the docking station or computer. Unplug both of them, count to 10 and plug them back in. Hopefully you will hear a noise. This is a good thing and you can do a happy dance.
Step 4: Orient
Click on the System Menu icon located in the system tray and choose orient. Tap on the dots and you are back in business.
In my experience, this works 99.99999% of the time. If you still don’t have interactivity after completing the steps above, please submit a help desk ticket. The main category is Smartboard and sub category is either Smartboard or Smart Projector Combo.
Even though I’ve been knee deep in district laptop deployment and not able to support my campuses in person, I know exactly what the teachers and students are up to at Bulverde Creek Elementary, San Antonio, Texas. They have an awesome group of bloggers that are diligent about showcasing student work and providing their students with a global audience. Bulverde Creek teachers have an instinctual ability to integrate technology in an engaging and creative way. I wanted to take this opportunity to share some of their ideas with you. Please feel free to leave comments on their blogs in support of their efforts.
Natalie Davis – Mrs. Davis is a 5th grade teacher and a master at appsmashing. This year she implemented an “Any App Pass” where they can choose any app to demonstrate understanding. Check out Wyatt and Preston’s product that shows how to simplify fractions using video and Snapguide:
Jill Corona and Jennifer Montemayor– are both Kinder teachers that regularly share online videos with their parents to support classroom instruction. They also post pictures of special days or events that happen on campus.
Amanda Morris is a fantastic music teacher that posts videos of student performances. Below you will find a percussion demonstration of a Jamaican folk song. Mrs. Morris also uses iPads for self-paced music stations. You can read about it and see examples by clicking here.
Kacie Germadnik, GT teacher at Bulverde Creek, is my personal go-to person for new technology ideas. She has a plethora of tools in her arsenal and uses them every week. One that caught my eye was the way she used Blendspace (formerly Edcanvas) to showcase a student collection of biographies made with Smore. It reminds me of those Russian nesting dolls… a tool, within a tool, within a tool. Here is Kacie’s description of the lesson:
“Push PLAY to journey through the awesome Smore Fliers created by 5th grade Gifted and Talented kids. These fliers were created to showcase the personal philosophies of these students through their development of I Believe statements, creating a Dream Team to inspire them to reach their goals, a Mandala that showcases their personal values and ideals, and a biography about how they might impact the world in the future.”
So, let’s review: Step 1- Students create biographies using Smore, Step 2-Teacher compiles all flyers using Blendspace, Step 3- Teachers shares student products with the world by embedding the Blendspace on her blog. Check out the example below.
In 2013, all NEISD computer labs were replaced with VDI machines using funds from the 2011 bond program. The biggest change teachers and students need to understand is the user may no longer modify the desktop appearance, including creating desktop shortcuts, saving work to the desktop itself or to the documents folder. Once a user is logged off, the desktop reverts back to a pristine image. The video below explains a VDI environment in detail.
Tips and Tricks for Navigating Through the Environment:
Web Only Access vs. Campus Hub– Choosing web only access will allow the user to navigate through the web without logging into Active Directory. The user will not have access to district software, personal, or shared directories. However, the user will have printing capabilities if the campus has followed the directions to setup up a printer manually on the thin client itself.Web only access should NOT be the default method that students use because the Firefox browser does not have all of the plugins that many web 2.0 products require to work consistently and effectively. Students and staff will need to select their campus hub if they wish to save work for later use or use district deployed software.
Logging On/Off– Students and teachers will use the same credentials used for Active Directory. Student login credentials can be accessed through the Employee Portal under Student Privacy Inquiry. *Note- Students can be logged into only 1 machine at a time, and there is no generic login.
Desktop Applications– All software is located in the My Applications folder on the desktop. Right click on the desktop to access web links such as Gizmos, Google Drive, Library Shortcuts, Scholastic Next Generation (this is the new SRI solution), and Think Through Math. There is also a link to a VDI Resource that provides information about current software features, troubleshooting tips, functionality expectations, and new developments that are on the horizon. Movie Maker and Photo Story are no longer available. See below for some web-based alternatives.
Printing– Printers are delivered to a user based on where they are physically sitting (according to the hostname of the actual machine itself). This means that if you are sitting in the library, you should only be able to see the library printers. If you are sitting in lab 18, you will only see the printers assigned to lab 18, and so on.
Maintenance– Please do not update any software or utilities such as Java or Flash. All updates will be handled remotely by Technology Services. The physical upkeep of hardware, microphones, and headphones are a campus responsibility. Purchasing information for new equipment can be found on the Automated Pricing System.
Saving Work– See directions below for saving work to the home directory. The Student Work Drop Folder that was available in the Novell environment will no longer be maintained. Use Google Docs if you need to save files for collaborative work. This can be accessed by right clicking on the desktop. Click here for more information on using Google Docs.
This slideshow requires JavaScript.
Shutting Down Workstations– Units should be powered on using the button on the Thin Client, but should be powered off using the on-screen SHUTDOWN option. DO NOT USE THE POWER BUTTON TO SHUT DOWN THE THIN CLIENT. The only time the power button should be used is if the thin client is frozen and you are unable to power down or restart using the on screen options. VDI units should be powered on Monday mornings and can be left on all week as they do not generate much heat or use much electricity. They should be powered down using on-screen options on Friday afternoons. This allows Technology Services to conduct updates after hours during the week so that instruction is not disrupted.
Accessing Student Home Directories– When logged in as a staff member, you can access all campus student home directories by going to Computer>(Campus Name)_Students. You can filter for individual students by typing their username in the search field located in the upper right corner.
Software and Web-Based Tools to Support Instruction
Hover over each image to see a linked tutorial on how to use that program. Many of the resources also include integration ideas. This is a great place to go if you are unfamiliar with our district software, or just need some additional ideas to support your instruction. Please contact your campus ITS if you would like assistance planning your next computer lab lesson.
There are many free web-based tools available to support classroom instruction. I’ve chosen a few of my favorites to showcase specific lessons and ideas. For a complete list of web-based tools, visit my Web Resources for Educators page.
Rock the Lab
Rock the Lab is a website dedicated to providing students with TEKS-based lessons that follow the NEISD scope and sequence. Each grade level has their own page that contains a lesson for every content area. Teachers have a section of their own with video tutorials on how to create student accounts for various web based tools or log in to district resources like Google Drive and Discovery Education. All lessons can be used in your computer lab.
Hang these posters in your computer lab to support higher levels of technology integration required by Standard V. NEISD Google Docs credentials required.
Oh how I love my conferences. No where on Earth will you find a larger concentration of teacher geeks (she says, proudly). I attended many sessions with new and relevant integration ideas and would like to share my new found knowledge with you.
The first session I went to was my favorite. Sean Junkins (follow him on Twitter!) and Danny Wysong presented iBook Field Trips using iBooks Author. I have used this application before, but never on this creative level. Here is his description: “In this era of interactive content, an iBook should be more than a book. iBook Field Trips are an opportunity to take full advantage of the wealth of interactive features available in iBooks Author. From Photo Safaris, iSpy books, Create Your Own Adventure novels, and Virtual Museums, there is no shortage of engaging learning experiences that can be created and carried out through iBooks.” Plan on reading many posts about this topic in the near future.
Leslie Fisher, who is one of my favorite presenter/entertainers, introduced me to a few new web tools, which poses a problem since I have no more room on my bookmarks bar.
Edcanvas allows on-line learners to organize and share their collection of digital resources. This nifty tool is a great way to share online resources with a set audience. As a teacher, I can see it working well as a student assignment: sending them on a digital ‘ scavenger hunt’ in a particular content area. I can also see it as an easy way to set up a series of on-line experiences for students (around a particular topic) as part of a “flipped classroom”. Edcanvas even allows you to create multiple choice and true/false assessments as part of your collection. Check out this PDF to get started.
Infuse Learning is a free online student response system similar to Socrative but a little more robust in that students can also hand-write, or draw responses. Like Socrative, students respond using a device (computer, iPod/iPad, iPod Touch, iPhone, and Android based phones and tablets) to teacher questions presented either verbally or through a pre-made quiz. Infuse Learning also offers the ability to push out internet links and images to connected devices.
Learnist allows you to create “learn boards” that are dedicated to a particular topic of choice. The learn boards are basically file folders that keep track of all the websites and resources that your students would need to access for research or projects. It is very similar to Pinterest, but many districts have blocked it due to social networking categories. Learnist is not blocked by our district (NEISD) and provides a safe environment for your students.
Let Me Google That For You – People may think you’re a genius when you’re actually a master Googler. Learn how to gently tell people to look up the answers to their questions by themselves. – See more at: http://www.quickanddirtytips.com
Tammy Worcester presented Tammy’s Top 20 Tech Tools. The one tool I was unfamiliar with was Batchgeo. This is a site that will generate a map based on location data. You can use a Google Form to collect the information and then copy/paste the data directly into the site. Some possible ideas for implementation include place-based story telling, mapping the birth places of your students, and visually displaying data for students to create their own math problems and solutions. Fortunately, I found Tammy’s presentation on You Tube so you can experience her knowledge first hand:
Kathy Schrock is the foremost authority on how to students can use the iPad to support higher order thinking. Her presentation focused on apps that support each level of Bloom’s Taxonomy. She has an entire website that will guide you through the implementation process. For more information, visit Kathy Schrock’s Guide to Everything: iPads in the Classroom.
Needless to say, my head is still spinning from the abundance of information presented at this conference. Look for future posts showcasing how teachers from our district are using these ideas with their students.
Kelly Richter at Northwood Elementary in San Antonio, Texas uses her blog to showcase student learning, share technology integration ideas with other teachers, and to communicate with parents on a regular basis. Her class recently visited Honey Creek in Guadalupe State Park where students were able to see various lifeforms found in healthy water and even created their own fossil rubbings. This was a great way to share the field trip experience with working parents who were unable to attend. She also models math problem solving strategies for students who may need additional practice at home. Check out Miss Richter’s blog at http://blogs.neisd.net/kricht/. Be sure to leave a comment and encourage the continuation of their blogging journey!
All Teachers know how to plan, organize, deliver, and evaluate instruction for all students that incorporates the effectiveuse of current technology for teaching and integrating the Technology Application TEKS into the curriculum.
Where Have We Been?
An Introduction to Technology Integration
Implementation Timeline
Year One (2012-2013):Provide professional development for all campus administrators. Administrators are required to attend three 30 minute Standard V professional development sessions presented during Principals Meetings scheduled between November 2012 and May 2013. Professional development will be geared toward identifying and recognizing good technology practices based on the Texas STaR Chart and ISTE national standards.
Year Two (2013-2014):All teachers will be required to attend one session of Standard V professional development and include one student technology project in their teacher self-report to be shared and discussed during the summative of their PDAS. The quality of the product and administrator walk throughs will be used to accurately access “Domain II-9. Use of Technology” of the teacher summative instrument.
Year Three (2014-2015): Same as previous year, but the number of student technology projects increases to (2) two.
Patterns of Classroom Use (Texas STaR Chart)
Early Tech (I use District required administrative tools.
I sometimes display electronic agendas and/or lecture slideshows. My students practice on the computer)
I occasionally use technology to supplement instruction, streamline management functions, and present teacher-centered lectures. My students use software for skill reinforcement.
Developing Tech(I teach students how to use software applications. I design and facilitate my student’s technology products.)
I use technology to direct instruction; improve productivity, model technology skills, and direct students in the use of applications for technology integration.
Advanced Tech (My students work in cooperative groups.
My students collect and analyze data gathered through advanced technology such as spreadsheets, databases, and data collection equipment. My students occasionally have choice in the form of their final product.)
I use technology in teacher-led as well as some student-led learning experiences to develop higher order thinking skills and provide opportunities for collaboration with content experts, peers, parents, and community. My students evaluate information; analyze data and content to solve problems.
Target Tech (My students design and structure their own learning. Students communicate with practicing experts to formulate solutions. Technology is available and used seamlessly.)
My classroom is a student-led learning environment where technology is seamlessly integrated to solve real world problems in collaboration with business, industry, and higher education. Learning is transformed as my students propose, assess, and implement solutions to problems.
Technology Application Standards for Grades K-12
Online Tools and NEISD Applications Available to Assist in Meeting Standards
Provide Professional development to be geared toward identifying and recognizing good technology practices based on the Texas STaR Chart and ISTE national standards.
Campus ITS will continue to provide model and co teaching experiences.
Campus ITS will continue to plan with grade levels and assist with the creation of technology integrated lessons that support classroom instruction.
Please note that you may not submit a student technology project for your PDAS portfolio that your campus ITS has modeled.
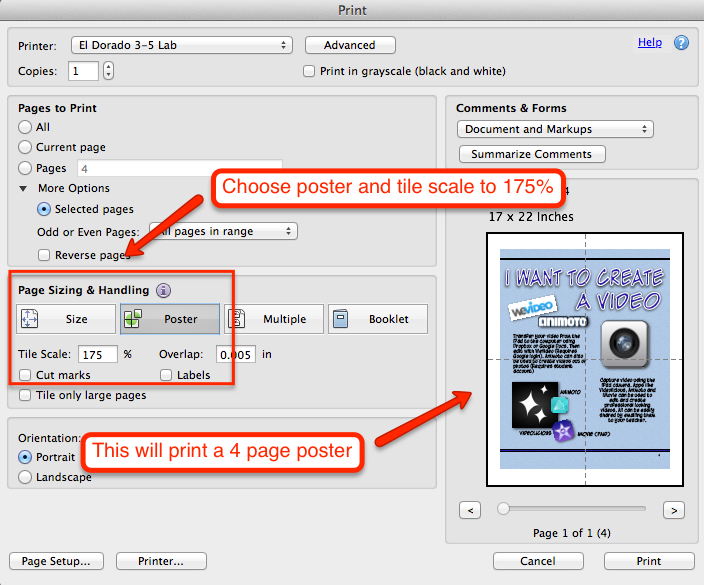
There are 2 technical changes you need to be aware of this year. If you are unable to access the Internet you may need to disable your proxy settings. Also, NEISD has a new content filter system called LightSpeed. See images below for details.
1. Click on Start > Settings > ControlPanel
and double-click on Internet Options.
2. Click on “Tools > Internet Options”.
3. Then click on the “Connections” tab.
4. Click on the “LAN Settings…” button.
5. Uncheck bottom box
6. Click OK and OK.
7. Launch Internet Explorer or your preferred
browser to access the Internet.
Staff will be able to override
blocked sites for a limited time. When you
In this webinar @tjhouston and @llacrosse will overview 20 apps in 20 minutes. These are the apps that were used in the classroom and found to be effective supplements to the curriculum. They were used with 5th grade science students while working with ipads for an entire school year.
While there is no perfect list of apps that will be guaranteed to work with all students in all classrooms, this list may be a good starting point for seeing the variety of apps available for the classroom. The types of apps available to teachers and students range from basic consumption of information apps to creation apps that allow teachers to provide a platform for students to showcase growth and learning. Each teacher and group of students will benefit from working to individualize their class with app usage. The best apps are those that work for YOUR content, YOUR class structure, and YOUR needs.
Are you a new to the world of SMART? You may have access to a SmartBoard on your campus or you may have a Slate that’s still in the box. The Lesson Activity Toolkit is a great way to begin learning the features of Notebook. Here’s a quick You Tube Video to help you get acquainted.
Below you will find a link to the Lesson Activity Toolkit Quickstart Guide. I have also included the Notebook Activity I use in my trainings. Check back often for more ideas on how to use the Notebook Software.
Enter a Start Date for when the form will appear on your site.
Enter an End Date for when the form will disappear from your site (optional).
Click Continue.
Questions:
Enter questions into the text fields.
Determine whether the question will be required or not by selecting the option Yes or No from the drop down menu under Required.
Under Answer Type, select either Short Answer, Medium Answer, Long Answer, True/False, Multiple Choice, Date Format, Email Address, File Upload or Information Only. File Upload allows visitors to upload files to your site.
Once you’ve entered in all of your questions, hit Save at the bottom of the page.
Your form address is indicated at the top of the Main Info page and can be copied and pasted anywhere on your site.
Limits Tab – To limit the number of submissions to your form, click on the Limits tab and enter in the maximum number. Hit Save.
Appointment Scheduler – gives you the ability to add appointment scheduling to any form i.e. Parent-Teacher Conferences, After-School Help sessions, Sports Physicals, or Drivers Ed Courses.
To setup the Appointment Scheduler:
When you click on the Limits tab, you’ll see Advanced Feature. Click on the click here link.
The next screen will ask you to enter in an Off Site date. The system will NOT display your form after the Off Site date.
You can enter in different dates on when the form will accept appointment submissions in the Start Accepting and End Accepting fields. For instance, the form may be up longer than the allotted timeframe for appointment scheduling.
Select the appropriate days of the week for the appointments.
Hit Next.
Select your date or dates.
Enter your max submissions per day.
Enter a “label” for each entry. Hit Save, enter more if needed.
Automatic time intervals for two hours, one hour, 30 minutes, and 15 minutes can easily be added by clicking on the links at the bottom of the page. Hit Save.
Duplicating a Form:
When you duplicate a form, the dates and times of the appt. scheduling can be carried over to the new form if the dates are in the future. There is a checkbox to select to include dates when duplicating a form.
Click on Edit Form.
Click on the Duplicatelink.
Edit the New Form Name, if necessary.
Select the questions to be copied over to the new form.
Hit Duplicate.
To view the individual results of a form:
Click on Form Submissions.
Click on the View link.The option to Print All submissions is available on this screen as well as the ability to change the status en masse.
Each submission is listed with date and time details.
Click on the View link next to the submission of interest.
This area will list the answers to each question as well as the computer IP address.
You can print the submission by clicking on the Print Submission link at the top.
You can mark the submission as Keep as New or select Already Seen by clicking on the drop down menu.There is also an area to enter internal comments.
Hit Save.
If there is a typo or inappropriate content added to the form, you can edit the form submissions by clicking on the click here to edit these answers link in the upper left corner.
To view the group aggregates:
Click on Totals.
Choose the questions you want on the report. The report will aggregate the submissions to show the number of people with the same answers. By default, questions that ask for “free form text” are not selected below as they are not easily aggregated (although you can select them).
To view graphs with your data, select the checkbox for ‘Check this box to display Graphs with your data (where applicable)’.
Hit Display.
To Download the submission data:
Click on Form Submissions.
Click on the Download link.
Select the Questions (Answers) to download.
Select All, New, Completed, etc.
Select Show on Screen, if desired.
Select Include Submission Number with Download, optional.
Hit Download.
Click the preferred report format button – PDF or Excel. You can also highlight the text and then copy and paste the data into the application of your choice.
Virtual field trips challenge and expose students to new types of technology. It is a great way to spark their interest and motivate their learning in a specific content area. Virtual field trips can offer students more opportunities because you can take them to places they wouldn’t normally be able to go to otherwise – like inside a volcano or ocean floor! In addition, virtual field trips may even boost students’ reading comprehension skills and will expose them to different cultures and environments.
While virtual field trips offer a great learning opportunity, they can be hard to organize and time consuming.
Below are examples of Virtual Field Trips created in Google Earth. Please contact me or your campus ITS if you would like to use one of the VFTs listed below, or if you would like assistance in creating one for your grade level.