A Russian Nesting Doll Lesson

Kacie Germadnik, GT teacher at Bulverde Creek, is my personal go-to person for new technology ideas. She has a plethora of tools in her arsenal and uses them every week. One that caught my eye was the way she used Blendspace (formerly Edcanvas) to showcase a student collection of biographies made with Smore. It reminds me of those Russian nesting dolls… a tool, within a tool, within a tool. Here is Kacie’s description of the lesson: “Push PLAY to journey through the awesome Smore Fliers created by 5th grade Gifted and Talented kids.  These fliers were created to showcase the personal philosophies of these students through their development of I Believe statements, creating a Dream Team to inspire them to reach their goals, a Mandala that showcases their personal values and ideals, and a biography about how they might impact the world in the future.”

So, let’s review: Step 1- Students create biographies using Smore. Step 2-Teacher compiles all flyers using Blendspace. Step 3- Teacher shares student products with the world by embedding the Blendspace on her blog. See the Russian nesting doll????

Posted in Uncategorized Tagged

SMART Notebook Professional Development

SMART Board Tips and Tricks

If you recently had your SMART board installed and don’t even know how to turn it on, then this is the class for you. Learn what all of those “cables and things” are hanging off the board, quick troubleshooting tips, and orientation tricks.

Level 1: SMART Introduction

(A: NO experience with software at all) In this class participants will be introduced to the Notebook software and begin using a few of the features. Participants will explore the basic tools: tables, screen shade, pens (including magic pen), shapes, text tools, lines and their properties. Participants will be given the opportunity to register for the SMART Exchange and see how to search for TEKS specific lessons.

Level 2: SMART Basics

(B: I have used the software minimally.) I have opened the software and can use the pens, shapes, lines, etc. in the toolbar. I need to learn ways to easily put my curriculum into the Notebook software to make the lessons interactive and more engaging. In this class, participants will explore the object properties menu: clone, copy, paste, delete, locking, grouping, ordering, flipping, and infinite cloning and the role these properties play in creating interactivity. Participants will also have the opportunity to explore the Lesson Activity ToolKit, Gallery Content and recording features.

Level 3: SMART Lesson Activity Toolkit

(C: I have used the tools and have a pretty good understanding of their uses, but want to explore the pre-made templates in the software.) Come and explore the Lesson Activity ToolKit and Gallery to create interactive activities. Participants will be given time to find and tweak lessons in the exchange, as well as to create their own lessons from scratch. This is a bring your own device class. Teachers need to bring their teacher laptops with the latest version of the Notebook software installed.

Level 4: SMART Intermediate

(D:I feel comfortable with all of the tools, but need some vision for how to use them to create interactive lessons) Come learn how to add interactivity to your lessons. Participants will explore 11 simple ways to add interactivity to a lesson (move to reveal, erase to reveal, change color to reveal, order objects, spotlight tool, table tool, identify and label, infinite cloner, pull tabs, dual page display, and the activity builder widget) and will have some time to tweak specific lessons using the learned techniques. This is a bring your own device class. Teachers need to bring their teacher laptops with the latest version of the Notebook software installed.

Level 5: SMART Advanced

(E: I use the software ALL the time and feel comfortable with the basic tools and object properties, but know there are some features of Notebook software that are unknown to me ) Come learn how to record with Notebook, embed videos, create links, animate objects, and learn about a new feature, widgets! This is a bring your own device class. Teachers need to bring their teacher laptops with the latest version. of the Notebook software installed.

Making Lessons POP with the Lesson Activity Toolkit

The Lesson Activity Toolkit for SMART Notebook software provides teachers with customizable tools and templates to help them easily create professional, interactive and engaging lessons. Teachers can start with templates for games, quizzes and sorting tables, or use the provided Flash tools to add interactivity to lessons. Once downloaded, the Toolkit is conveniently integrated into SMART Notebook software’s Gallery.

Magic Reveal Techniques

Lesson activities need to be designed for both content and presentation. Knowing a little about design and the best practices on how to build interactivity using Notebook software will help you create lessons that meet curriculum learning objectives and engage students. In this course you will learn 6 interactive reveal techniques that capture your students’ attention. A basic understanding of the Notebook interface is required.

Modifying Lessons from the SMART Exchange

The SMART Exchange offers a wide variety of already created SMART Notebook lessons for teachers. In this class you will learn how to search their database for exactly what you need, and how to modify lessons to increase the level of thinking while adding more interactivity.

Interactive Websites for the SMARTboard (K-5)

This hands-on class will focus on free web-based tools that work perfectly on the SMARTboard. Over 30 sites will be featured for cross-curricular integration. Participants will also learn how to embed these sites within a Notebook file.

Weekly SMART Challenges

I often hear from teachers that they don’t have time to attend technology trainings due to tutoring or other departments requiring after school professional development. Below you will find weekly challenges for those that are interested in learning more techniques and strategies for using Notebook on their SMART Board or Slate. Each week I will provide a video tutorial demonstrating a skill with an example.

Example Lessons 

Self-paced tutorials

  • Using the Attachments Tab in SMART Notebook Software – Flash
  • Using the Add-ons Tab in SMART Notebook Software – Flash
  • Using the Google 3D Warehouse in SMART Notebook Software – Flash  

Quick reference guides

  • The Magic Tunnel Effect – PDF
  • The Magnifying glass – PDF
  • The SMART Notebook Page Recorder – PDF
  • Creating and Customizing Pull tabs – PDF
  • The random generator Tool – PDF
  • The Balloon Pop Tool – PDF
  • The Checker Tool – PDF
  • The Erase to Reveal Effect – PDF


Favorite Back-to-School Tool: Thinglink

Thinglink is a free, easy to use online tool that allows you to make any graphic or photo interactive. Create multiple hot spots on specific parts of your image that link to a website, video, music, text, or audio file. Thinglink education accounts lets teachers and students store an unlimited number of images.  Embed easily to Edmodo, Facebook, Twitter, Google+, Tumblr, Pinterest…etc, using their share button. The interactive image below contains different ways that educators can use Thinglink in the classroom. 

More resources that you might find useful:

My Brain on ISTE

iste

Oh how I love my conferences. No where on Earth will you find a larger concentration of teacher geeks (she says, proudly). I attended many sessions with new and relevant integration ideas and would like to share my new found knowledge with you.

The first session I went to was my favorite. Sean Junkins (follow him on Twitter!) and Danny Wysong presented iBook Field Trips using iBooks Author.  I have used this application before, but never on this creative level. Here is his description: “In this era of interactive content, an iBook should be more than a book. iBook Field Trips are an opportunity to take full advantage of the wealth of interactive features available in iBooks Author. From Photo Safaris, iSpy books, Create Your Own Adventure novels, and Virtual Museums, there is no shortage of engaging learning experiences that can be created and carried out through iBooks.”  Plan on reading many posts about this topic in the near future.

Leslie Fisher, who is one of my favorite presenter/entertainers, introduced me to a few new web tools, which poses a problem since I have no more room on my bookmarks bar.

  • Edcanvas allows on-line learners to organize and share their collection of digital resources. This nifty tool is a great way to share online resources with a set audience. As a teacher, I can see it working well as a student assignment: sending them on a digital ‘ scavenger hunt’ in a particular content area. I can also see it as an easy way to set up a series of on-line experiences for students (around a particular topic) as part of a “flipped classroom”. Edcanvas even allows you to create multiple choice and true/false assessments as part of your collection. Check out this PDF to get started.
  • Infuse Learning is a free online student response system similar to Socrative but a little more robust in that students can also hand-write, or draw responses.  Like Socrative, students respond using a device (computer, iPod/iPad, iPod Touch, iPhone, and Android based phones and tablets) to teacher questions presented either verbally or through a pre-made quiz.  Infuse Learning also offers the ability to push out internet links and images to connected devices.
  • Learnist allows you to create “learn boards” that are dedicated to a particular topic of choice. The learn boards are basically file folders that keep track of all the websites and resources that your students would need to access for research or projects. It is very similar to Pinterest, but many districts have blocked it due to social networking categories. Learnist is not blocked by our district (NEISD) and provides a safe environment for your students. 
  • Let Me Google That For You – People may think you’re a genius when you’re actually a master Googler. Learn how to gently tell people to look up the answers to their questions by themselves. – See more at: http://www.quickanddirtytips.com

Tammy Worcester presented Tammy’s Top 20 Tech Tools. The one tool I was unfamiliar with was Batchgeo. This is a site that will generate a map based on location data. You can use a Google Form to collect the information and then copy/paste the data directly into the site. Some possible ideas for implementation include place-based story telling, mapping the birth places of your students, and visually displaying data for students to create their own math problems and solutions. Fortunately, I found Tammy’s presentation on You Tube so you can experience her knowledge first hand:

Kathy Schrock is the foremost authority on how to students can use the iPad to support higher order thinking. Her presentation focused on apps that support each level of Bloom’s Taxonomy. She has an entire website that will guide you through the implementation process. For more information, visit Kathy Schrock’s Guide to Everything: iPads in the Classroom.

Needless to say, my head is still spinning from the abundance of information presented at this conference. Look for future posts showcasing how teachers from our district are using these ideas with their students.

GaGa 4 Google

google certificate


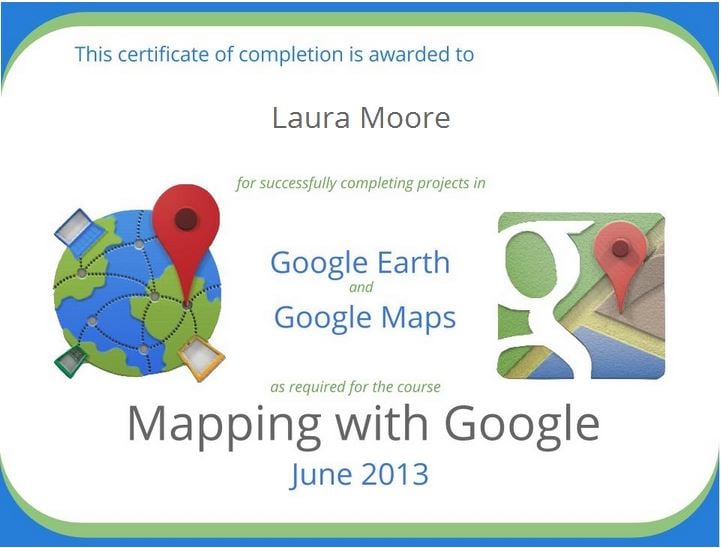
I just completed the free Mapping with Google online course. I thought I knew everything about Google Earth, but there were a couple of features unfamiliar to me. My final product for the Google Earth portion was a Thanksgiving Timeline virtual field trip for K-8 students. One of the advanced required features was to embed the tour on a blog, so here is the updated tour:

The embed gadget that I’m using can be a little wonky, so click here if you would like to download the tour and view it within Google Earth. See my previous blog posts to see my Google Maps Engine Lite project and the Haunting Shipwrecks with AC/DC tour.

Prezi Perfection!

I’ve been working on creating a series of Prezi presentations for Standard V and stumbled upon this fantastic example on explaining the Theory of Relativity:

It reminded me of how powerful a tool Prezi can be when students are tasked to demonstrate understanding of a concept. Prezi now offers a variety of templates to make the creation process easier and less time consuming. The target tech level of technology integration requires giving students a choice of presentation tools. Because of Prezi’s unique interactive features and the ability to add multimedia, images, and animations, students will naturally gravitate toward this particular tool. Click here to view a Prezi tutorial.  For  more information on the different levels of technology integration, view my Standard V Prezis below:

Posted in Uncategorized Tagged

Timelapse Video in Google Earth

As many of you know, Google Earth is one of my favorite cross-curricular tools to use with students. They recently added a timelapse feature that makes it possible to view changes in the Earth’s surface over a period of time. Click here to read more about it.

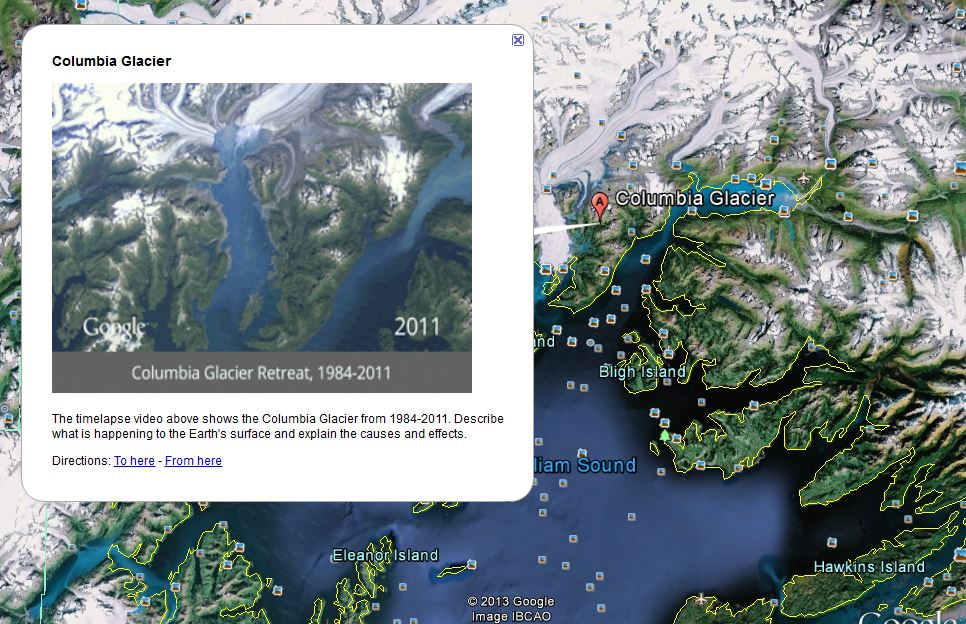
In the example above, students can explore a global timelapse video of our planet, constructed from Landsat satellite imagery. The Columbia Glacier is retreating at a rapid rate. Each frame of the timelapse map is constructed from a year of Landsat satellite data, constituting an annual 1.7-terapixel snapshot of the Earth at 30-meter resolution. The Landsat program has been acquiring images of the Earth’s surface since 1972. Landsat provides critical scientific information about our changing planet. How can this new feature enhance your Google Earth placemarks? They can be embedded! Simply right click on the timelapse video you would like to use and select “inspect element”. Copy and paste the highlighted HTML code into your placemark. Below is a screenshot of a placemark I created and some follow-up questions for students. More featured sites can be found here: http://earthengine.google.org/#intro


Columbia Glacier


One “Smore” Tool for your Arsenal

Every month or so I find a new tool to fall in love with. I think this might be my favorite tool of the year. Smore is a free online service that allows you to create dynamic flyers that include links, video, text, images and even maps. Over the past few weeks, Mrs. Davis’ 5th grade class at Bulverde Creek have been learning about different inventions and how a simple invention can change the world.  Each pair of students chose an inventor to research and then used smore.com to create flyers.  Click here to see a few of the AMAZING results.  Below is an introductory video that demonstrates how easy it is to use. 

Adding Voice Comments to a Google Doc

This gem of a find comes to you via Susan Reeves, Instructional Specialist, Digital Age Learning for the Education Service Center, Region 20 in San Antonio, Texas. Google Docs is one way for you and your students to easily collaborate in real time. By adding this extension, you now have the ability to leave voice comments, which can be helpful for struggling readers. You can also use it as a tool to improve fluency by having students read a passage that you have uploaded. This is by far one of the easiest tools to add to your arsenal.

The Richter Report

Kelly Richter at Northwood Elementary in San Antonio, Texas uses her blog to showcase student learning, share technology integration ideas with other teachers, and to communicate with parents on a regular basis. Her class recently visited Honey Creek in Guadalupe State Park where students were able to see various lifeforms found in healthy water and even created their own fossil rubbings. This was a great way to share the field trip experience with working parents who were unable to attend. She also models math problem solving strategies for students who may need additional practice at home. Check out Miss Richter’s blog at http://blogs.neisd.net/kricht/. Be sure to leave a comment and encourage the continuation of their blogging journey!

Standard V for NEISD

What is Standard V?

All Teachers know how to plan, organize, deliver, and evaluate instruction for all students that incorporates the effective use of current technology for teaching and integrating the Technology Application TEKS into the curriculum.

Where Have We Been?


An Introduction to Technology Integration


Implementation Timeline
  • Year One (2012-2013): Provide professional development for all campus administrators. Administrators are required to attend three 30 minute Standard V professional development sessions presented during Principals Meetings scheduled between November 2012 and May 2013. Professional development will be geared toward identifying and recognizing good technology practices based on the Texas STaR Chart and ISTE national standards.
  • Year Two (2013-2014):  All teachers will be required to attend one session of Standard V professional development and include one student technology project in their teacher self-report to be shared and discussed during the summative of their PDAS. The quality of the product and administrator walk throughs will be used to accurately access “Domain II-9. Use of Technology” of the teacher summative instrument.
  • Year Three (2014-2015):  Same as previous year, but the number of student technology projects increases to (2) two.

Patterns of Classroom Use (Texas STaR Chart)


Early Tech (I use District required administrative tools.
I sometimes display electronic agendas and/or lecture slideshows. My students practice on the computer
)

I occasionally use technology to supplement instruction, streamline management functions, and present teacher-centered lectures. My students use software for skill reinforcement.

Developing Tech (I teach students how to use software applications. I design and facilitate my student’s technology products.

I use technology to direct instruction; improve productivity, model technology skills, and direct students in the use of applications for technology integration.

Advanced Tech (My students work in cooperative groups.
My students collect and analyze data gathered through advanced technology such as spreadsheets, databases, and data collection equipment. My students occasionally have choice in the form of their final product.) 

I use technology in teacher-led as well as some student-led learning experiences to develop higher order thinking skills and provide opportunities for collaboration with content experts, peers, parents, and community. My students evaluate information; analyze data and content to solve problems.

Target Tech (My students design and structure their own learning. Students communicate with practicing experts to formulate solutions. Technology is available and used seamlessly.)

My classroom is a student-led learning environment where technology is seamlessly integrated to solve real world problems in collaboration with business, industry, and higher education. Learning is transformed as my students propose, assess, and implement solutions to problems.


Technology Application Standards for Grades K-12


Online Tools and NEISD Applications Available to Assist in Meeting Standards

Technology Services Can:
  • Provide Professional development to be geared toward identifying and recognizing good technology practices based on the Texas STaR Chart and ISTE national standards.
  • Campus ITS will continue to provide model and co teaching experiences.
  • Campus ITS will continue to plan with grade levels and assist with the creation of technology integrated lessons that support classroom instruction.
  • Please note that you may not submit a student technology project for your PDAS portfolio that your campus ITS has modeled. 
Other Tools and Resources:
Suggested Online Tools for Portfolio Submission:

Voki’s Getting SMARTer

Notebook 11 makes it easy to include a Voki avatar in your SMART Notebook lessons. Below you will find a video showing how to download the widget and embed the HTML code right into the software. This will make your presentations much more engaging for students and allows them yet another way to demonstrate understanding of a concept. Visit the SMART Exchange to find this Voki widget and more. Click here for a PDF tutorial on how create your own Voki: Voki Tutorial


You will need to have a Voki account in order to use this widget. You can also create free accounts for your students using their Google Docs credentials. See your campus ITS for more information. Here are a few examples of how you can use Voki avatars within the Notebook Software:

Digital Vocabulary Activities for Upper Elementary

As part of my “Anchor Activities” series, here are a few digital vocabulary ideas that students can complete during SSR time or in Math/Literacy stations. Have students generate a list of vocabulary words they are unfamiliar with (or assign them specific words from your Math or Science word walls) and allow them to choose from the following activities:

I’ve made some examples of each using the word “condensation”

There are a variety of online vocabulary resources for support in defining and explaining concepts:

Flip Your Classroom With LearnZillion

What is LearnZillion? (Taken from FAQs)

LearnZillion is a web-based application that helps teachers and parents meet the educational needs of every student. They offer 2000 lessons that were built from the Common Core standards and were created by some of the top public and private school teachers from around the country. Each lesson includes a short video, downloadable lesson guide and resources, and coach’s commentary to help with teacher development. They are also a vibrant and growing community of educators working to improve our teaching practice through collaboration.

There are many ways to use LearnZillion. You can use their resources to help you plan everything from an individual lesson to your entire year. Watch the videos for ideas on how to teach a specific topic. Download the lesson slides and present them as part of your direct instruction or adapt them as part of a new lesson plan. Watch videos as a class or in small-groups. Assign videos directly to students or groups to pre-teach or review material or as a way to differentiate instruction in class.

Creating an account is super simple! Just click on “Teachers” in the upper-right corner of any page where it says “Sign Up,” then enter in your name, email and password. If you have a Google Account you can also sign in using that so that you have one less password to remember. Easy and free!

For more information about using the site and creating class assignments, click here.

Here is an example of a 4th grade lesson on locating benchmark numbers on a number line:

  1. Give your students a quick code to watch this lesson ( see what your students will see! ) and have your students take notes to reinforce the concepts.
  2. Send home this letter introducing parents to LearnZillion and telling them how to support their student’s learning at home.
  3. Download the lesson slides and use them to plan your instruction.
  4. Do a deep dive of a Common Core standard with colleagues using this protocol for discussion.


QR Code Storytelling at Windcrest

Mrs. Williams’ 4th Grade students at Windcrest Elementary used 3 digital devices to create their own stories based on the book Dog in Boots, by Greg Gormley. Here is a brief description of the book:

Inspired by his favorite story about a cat with fantastic boots, Dog heads to the local shoe store and emerges with some splendid footwear. But Dog soon discovers that his fancy shoes won t let him do doggy things. He tries flippers, high heels, even skis, but can t find anything that is just right. Could the perfect solution be right under his nose?

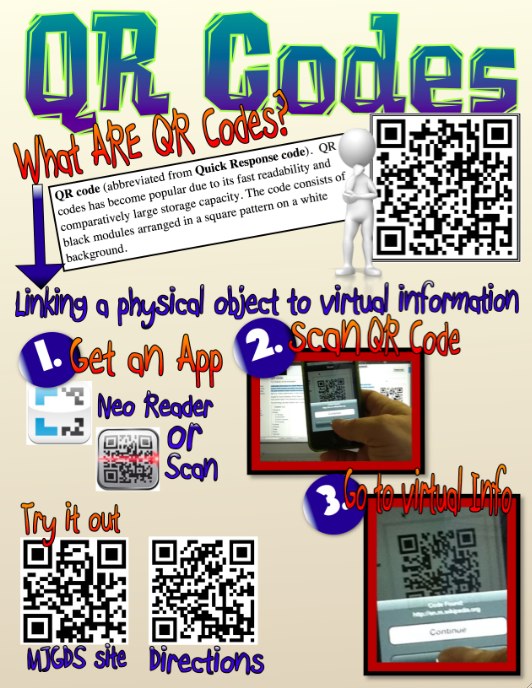
The students wondered what would happen if Dog tried on a variety of hats. Would he take on the personality of the hat? What if the hat were occupationally related? Would he still act like a dog or take on more human characteristics? After writing a rough draft in the classroom, students were taken to the library and each given a Neo AlphaSmart unit to publish their story. These word processing units have a built in spell check and Thesaurus tools to assist in the editing and revising stage of the writing process. Once their final draft was complete, student sent their text via a USB cable to QRstuff.com, a free website that generates a QR code from many different data types. Instructions for using this site can be found at the bottom of the post. The QR codes were put on display in the library for students and teachers to scan using a QR code scanner app on their iPads. 

Here are some links to more ideas for using QR codes in the classroom:

Kathy Schrock’s Guide to Everything

Free Technology for Teachers by Richard Byrne

TechChef4U

Creating a QR code for student writing