Symbaloo has been a longtime favorite curating resource of mine, so I was really excited when I stumbled upon this Symbaloo of Symbaloo tutorials. This week, they are launching a new feature that allows you to create folders for better organization. It’s very much like creating folders on an iPad for similar apps, just drag and drop to create your groups. Symbaloo is the perfect tool for organizing all of your favorite websites for easy student access. For additional ways to use Symbaloo, check out my VDI Elementary Toolkit page.
Search Results for: student blog
Standard V Lesson Examples
Beginning with the 2013-2014 school year, NEISD teachers will be required to submit 1 student product that was created using technology. This initiative supports the Standard V requirements as outlined by SBEC. For the 2014-2015 school year, the number of product submissions will increase to 2. Below are some examples of Standard V lessons I have created with my campus grade levels. Many of these app/web tools are cross-curricular and can be applied to different TEKS or units of study. Please contact me if you have an idea for a lesson or need a similar task card to use with your students.
- Kinder Language Arts K.6A identify elements of a story including setting, character and key events: Facetalk Retelling
- 1st Grade Math 1.3 The student applies mathematical process standards to develop and use strategies for whole number addition and subtraction computations in order to solve problems: Farmyard Math
- 1st Grade Language Arts 1.9 A Describe the plot (problem and solution) and retell a story’s beginning, middle, and end with attention to the sequence of events: BME Summaries
- 1st Grade Science 1.10 Organisms and environments. The student knows that organisms resemble their parents and have structures and processes that help them survive within their environments. The student is expected to: investigate how the external characteristics of an animal are related to where it lives, how it moves, and what it eats. Animal Research Augmented Reality Project
- 1st Grade Social Studies 1.12 Government. The student understands the role of authority figures, public officials, and citizens. The student is expected to: (A) identify the responsibilities of authority figures in the home, school, and community; (B) identify and describe the roles of public officials in the community, state, and nation; Careers Research Thinglink Project
- 2nd Grade Science 2.5D Combine materials that when put together can do things that they cannot do by themselves such as building a tower or a bridge and justify the selection of those materials based on their physical properties: Videolicious Structures Project
- 2nd Grade Science The student knows that matter has physical properties and those properties determine how it is described, classified, changed, and used. Matter and Energy Storehouse Project
- 3rd Grade Science 3.8B Describe and illustrate the Sun as a star composed of gases that provides light and heat energy for the water cycle: Thinglink Water Cycle Project-PDF, Thinglink Water Cycle Project-Word 2013
- 3rd Grade Reading SE 3.16 Students use comprehension skills to analyze how words, images, graphics, and sounds work together in various forms to impact meaning. Students will continue to apply earlier standards with greater depth in increasingly more complex texts: Big 6 Research Project-PDF, Big 6 Research Project-Word 2013
- 3rd Grade Math 3.11B: The student directly compares the attributes of length, area, weight/mass, and capacity, and uses comparative language to solve problems and answer questions. Perimeter Party
- 3rd Grade Reading 3.11 (A) read independently for a sustained period of time and paraphrase what the reading was about, maintaining meaning and logical order. 3.20 (C) write responses to literary or expository texts that demonstrate an understanding of the text. Digital SSR Using Symbaloo
- 4th Grade History 4.3 The student understands the importance of the Texas Revolution, the Republic of Texas, and the annexation of Texas to the United States: Google Tour Builder
- 5th Grade Science 5.8 Students will understand that weather represents the short term conditions of the atmosphere by producing a video that explains weather patterns of a specific region over a 3 week period: Videolicious Weather Project
- 5th Grade Science: 5.7 Earth and space. The student knows Earth’s surface is constantly
changing and consists of useful resources. Earth’s Forces Discovery Education and Thinglink Project
- 5th Grade Math 5.6: Patterns, Relationships, & Algebraic Thinking – Words to Symbols : Glogster Word Problem Videos by Lisa Johnson
- 5th Grade Reading 5.6 (B) explain the roles and functions of characters in various plots, including their relationships and conflicts: Read Write Think Character Analysis
More Examples from Jennifer Heine, NEISD Instructional Technology Specialist
The Interactive Classroom
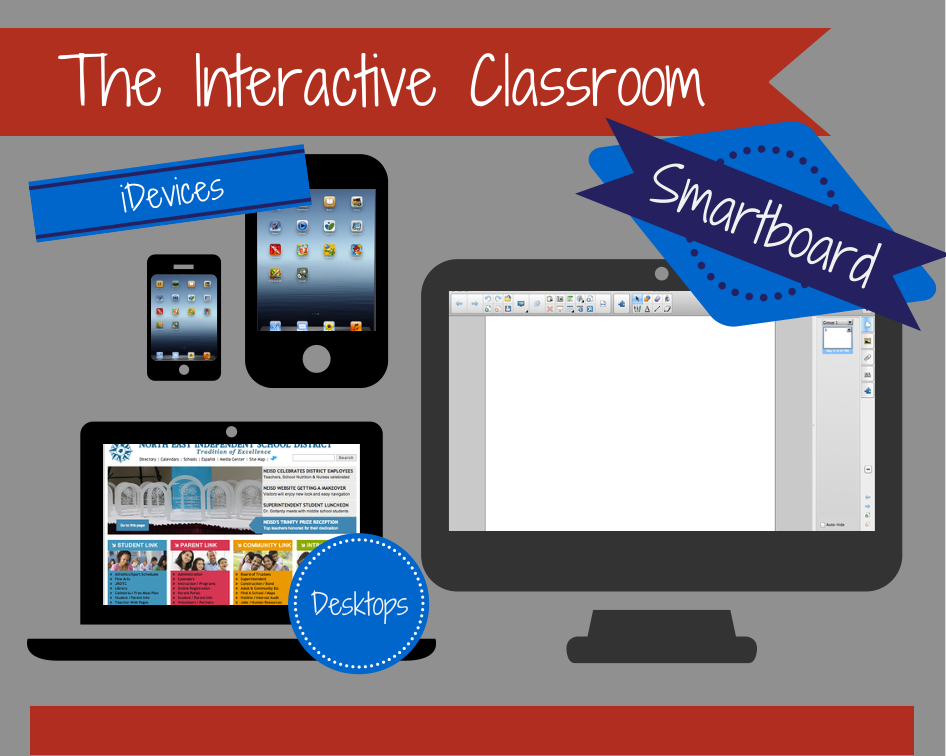
Imagine a bulletin board that plays videos created by your students, or a word wall that actually pronounces vocabulary words and provides definitions. Display student work that, when scanned by parents or other class members, gives a brief description of how it was made and learned concepts explained in their own words. Create a collaborative timeline of a historical event that comes to life. Easily gain instant insight into how well the class grasps a lesson. Create a video production area in your classroom to facilitate creation. All of these interactive ideas are possible with just a few digital tools and a creative mind. Below are a few examples of interactive products that you and your students can create.
| Augmented Reality Tools | Augmented Reality Examples |
| QR Code Tools | QR Code Examples |
| SMARTboard Tools | SMARTboard Examples |
|
|
| Formative Assessment Tools | Formative Assessment Examples |
| Collaborative Wall Tools | Collaborative Wall Examples |
Aurasma Video Tutorial
Technology Lapbooking
A lapbook is a hands-on tool that you can use with your students in place of worksheets or other monotonous learning tools. It can be used with any grade level and with any subject matter! Lapbooks become portfolios that your students create about a particular topic or unit of study. They are easy to store and fit into a file cabinet, file box, or magazine holder with ease. In addition, lapbooks are an instant review tool for assessments.
How Can I Integrate Technology With Lapbooking?
Lapbooks are made up of smaller projects using Microsoft Office applications. When all foldable projects are printed, the student uses file folders to create a comprehensive portfolio. I have provided a number of templates below along with examples of how to integrate them with the curriculum content.
What Are the Benefits of Technology Lapbooking?
-
Allows for more integration of technology in the labs using desktops or in the classrooms using AlphaSmarts/Neos, laptops, document cameras, and iPads
-
Provides an opportunity for student collaboration
-
Students are using problem-solving skills when designing technology projects and lapbooks
-
Meets SBEC Standard V requirements- All teachers know how to plan, organize, deliver and evaluate instruction for all students that incorporates the use of current technology for teaching and integrating the TEKS in the curriculum
What Types of Materials Will I Need?
-
File Folders
-
Glue Sticks for Projects
-
Wide, Clear Packing Tape for File Folders
-
Scissors
-
Foldable Templates Saved to the Student Shared Drive
-
Computers, AlphaSmarts/NEOs, Printer, Laptops, iPads, Digital cameras
Begin with the end in mind. Think about the questions you will be asking on your final assessment. Your projects need to lead your students to be successful in understanding the concepts within a particular unit of study. Then pair that concept with the appropriate template. Below is an example using the Natural World for 4th grade. Click here for a planning guide.
The resources below are housed on box.com, a site that is blocked by our Internet filter. Click here and login twice with your credentials. All resources will be available for 90 minutes. You will not need to do this if outside the NEISD district.


The following templates are from Jim Holland and Gaby Krumm @ Print Cut Fold
Awesome books for more awesome ideas!
- Print, Cut, and Fold: Creative Technology Projects for Language Arts
By Jim Holland and Gaby Krumm - Print, Cut, and Fold: Creative Technology Projects for Science
By Jim Holland and Gaby Krumm - Big Book of Texas History
By Dinah Zike - Big Book of Science
By Dinah Zike - 50 Quick and Easy Reading and Writing Computer Activites
By Tammy Worcester - The Ultimate Lapbook Handout
By Cyndy Regeling and Tammy Duby
Digital Storytelling on the iPad
There are many apps out there (paid and free) that are great for digital storytelling. I’ve written about several before, but I wanted to share a new one with you called Storehouse. Storehouse is a free, easy to use app that allows students to visually tell a story through video, images and text. They just recently added the ability to share on social media, embed a preview on a website, and add comments or ask the author questions. As with other storytelling apps I have showcased before, Storehouse can be cross-curricular for non-fiction projects such as explaining scientific concepts or retelling historical events. Below is a stunning collection of images and videos capturing the beginning of spring.
Interested in learning about hedgehogs? Check out this one:
For more ideas on digital storytelling using the iPad, visit my Book Creator Apps for the iPad page that includes examples of use and video tutorials.
App Flows Template via Graphite
I have been obsessed over the past few months with the concept of app-smashing, the process of using, or “smashing”, different apps together to complete tasks and create rich student products. Organizing the way in which I present an app smash to teachers is something I have been struggling with, so I was thrilled when I stumbled upon Graphite’s App Flow Template and lesson bank. Kelly Mendoza does an excellent job of comparing app flows and app smashing in her post on Graphite,
If you’re already using App Flows, our interactive lesson-planning template on Graphite, you might be curious how app smashing and App Flows compare. Both approaches move away from being singularly app- or tool-centric. Instead, both highlight how apps can be used in conjunction with one another to reach an objective or complete a task. However, it seems that app smashing centers on transforming student projects to be rich media creations, whereas an App Flow is a broader framework for instructional planning. App Flows include pedagogical insight, allowing you to focus on incorporating a variety of digital media tools, including subject-specific ones, throughout lesson. Both of these concepts truly encourage the seamless use of technology to meet chosen learning objectives. The possibilities are endless!
The image below shows how this framework is organized. The tool used in each part of the framework can be an app, web based tool, or just a simple discussion to clarify concepts. It truly demonstrates seamless integration and is a nice way for teachers that are uncomfortable using technology to experiment with a few tools at a time. Check out the flows that are already in the database and try creating one of your own.

App-Smashtastic Retelling Project!
I recently stumbled upon one of the most creative app-smash projects I have ever seen from Davyhulme Primary School, United Kingdom. The students were focusing on retelling traditional tales, as well as looking at punctuating direct speech. Here is a description of the apptivity:
To help them develop this further, the children created a comic strip of a traditional tale, adding speech bubbles and by using the iPad were able to fill the speech bubbles with videos of the children acting as the characters. This really helped develop the children’s understanding of how to describe the reporting clause. They were able to see how everything the character says including any punctuation, goes inside the speech bubble, therefore inside the speech marks. It also showed how well the children understood the story if they could act in character.
You can read the entire post here. App-smashing is the process of using multiple apps to complete a final product. This particular example uses the iPad camera, Comic Life ($4.99), and Thinglink. The background contains images from the story The Three Little Pigs with the faces of the students superimposed on top, thus making the students the characters in the story. Notice how the students capture the emotion of the characters through facial expressions (my favorite part). Videos of students retelling the story are revealed as you hover your cursor over each speech bubble. I’m sure the energy and excitement during the creation of this product was insane. It makes me want to go back to the classroom! Thank you class 2A for sharing your masterpiece. For more information about app-smashing, check out Lisa Johnson’s post: App Synergy: The Art Form of App-Smashing.

App Smash Workflow for an Interactive Comic:
- Use the iPad camera to take pictures of the images in the book you are reading (In this case, The Three Little Pigs). Also take pictures of your students that you will superimpose over the images from your story.
- Use Stackr to layer and crop your images from step 1 and save to your camera roll.
- Use Comic Life or some other comic creator app of your choice and insert the images from your camera roll. Add speech bubbles as these will be the place markers for the student created videos.
- Save your image created in Comic Life, or other comic creator app, to your camera roll.
- Have students record video of themselves retelling important parts of the book. The script needs to match the images that you took earlier. These videos will also be saved in your camera roll.
- Open Thinglink and upload your comic book image.
- Add the video tags from your camera roll and place them in the speech bubbles.
Tool of the Month: Board Builder
The Discovery Education Network has long been a favorite source for interactive content to support classroom instruction. Most teachers are familiar with their vast collection of streaming videos, but they also offer additional services designed to accelerate student achievement. One of the most recent additions is Board Builder, a fun and easy way for students to create digital content for all subject areas. This tool is very similar to other web based poster creators such as Glogster or Smore, but differs in that students can add content directly from the Discovery Education media library. They can also upload content they have created such as audio, images, video and attachments from their computer.
NEISD has purchased a subscription to Discovery Education for all students and teachers. Susan Reeves, Educational Specialist, Digital Age Learning for the Education Service Center, Region 20 in San Antonio, has created 2 videos to help get you started:
- Discovery Education Teacher Board Builder Directions
- Discovery Education Board Builder Student Information
DEN Team member Jeanette Edelstein created this list of 50 Ways to Use Board Builder that includes links to actual boards. These are great examples that can help you visualize using this tool. Click here for a complete list of resources to help you navigate through the Discovery Education site.
50 Ways to Use Board Builder by lmoore4
Moore Flippin’ Resources
A “Flipped Classroom” is a classroom that uses class time to do activities/lessons (guided by the teacher) and “homework” time for guided instruction, usually through video. Basically, it turns a classroom upside down: the learning of a topic is done at home and then the applied practice or work is done at school. For an excellent info-graphic on what a “Flipped Classroom” is click here. – See more at: techlearning.com
Video Lesson Libraries
Don’t reinvent the wheel. There are thousands of video lessons already out there. Here are a few sites to get you started:
- Teaching Channel offers educators a wide range of subjects for grades K-12. The videos also include information on alignment with Common Core State Standards and ancillary material for teachers to use in their own classrooms.
- Knowmania‘s library includes over 15,000 video lessons on school subjects from teachers everywhere. Each lesson contains relevant tags so it’s easy to find. App available for the iPad.
- LearnZillion is a learning platform that combines video lessons, assessments, and progress reporting. Each lesson highlights a Common Core standard, starting with math in grades 3-9. App available for the iPad. Tutorials: Create a class, Enroll students,Assign Lessons
- Khan Academy covers math, science topics such as biology, chemistry, and physics, and even reaches into the humanities with playlists on finance and history. App available for the iPad
- YouTube, School Tube, Teacher Tube– All have a wide variety of videos on various topics.
- SchoolsWorld- is a brand-new, multimedia platform, providing innovative and informative content for everyone involved with or wanting to be involved in schools. Besides all the content from Teachers TV, there is something for everyone: videos, interactive games, work sheets, fact sheets, information and latest education news.
- Math Playground – Step by step videos show how to solve
math problems from number properties to algebra. - OpenEd– the world’s largest educational resource catalog (over a quarter million of them). OpenEd is committed to keeping all of this access available free to all teachers worldwide.
- My Pinterest collection of Flippin’ Videos
Video Recording Tools
Can’t find a lesson that addresses your specific needs? It’s easy to create your own content video using these free resources:
- SMART Notebook Video Recorder: Tutorial
- Educreations App for the iPad: Tutorial by Brad Cloud
- AVERmedia Document Camera: Tutorial by Brad Cloud
- Screencast-o-matic: Tutorial by Wesley Ryan
- Touchcast: Tutorial by Brad Cloud
Hosting Platforms
Once you have your videos, you will need to host them on a site your students can access from home and school.
- NEISD Google Docs Resources Once your video is uploaded and shared with the public, click on the video and chose the “pop-out” option. Then click on the 3 dots and chose embed item. Copy the code and paste in your blog or website. Click here to see an example of a Google Site used as a Teacher Web replacement. Example (mp4 format):
- Edublogs– The easiest way to upload videos from your iPad to your blog is through the Edublogs app. Maximum upload file size for videos: 32 MB.
- Edmodo– When you upload a video to Edmodo, it will give you a URL, thus viewable on any device with Internet connection. However, it will not be embeddable on other platforms. (100MB max)
- Blendspace– Create lessons in 5 minutes, collect web resources in one place and share with just one link, measure student understanding with built-in quizzes, monitor student progress and adapt to student needs in real-time. Lesson Tracking Tutorial Blendspace supports playing videos uploaded or imported from Dropbox or Google Drive with the following formats: M4V, OGV, WEBMV, FLV
- YouTube– YouTube is probably the easiest way to upload your content to the web for viewing, however, the NEISD filter will not allow students to view videos on district devices while on campus. Viewers would have to use the Internet from home. If all students in your class have Internet access, this would be the best solution.
Flippin’ Awesome Examples
- Lauren Snyder at Tejeda Middle School, San Antonio, TX
- Lee Dewitt at Roosevelt High School, San Antonio, TX
- Jennifer Avitia at Driscoll Middle School
- 8th Grade History Teachers at Krueger
- Kimberly Leyva, 4th grade teacher at Woodstone Elementary, San Antonio, TX
- Gladys Marrone, 4th grade teacher at Woodstone Elementary, San Antonio, TX
Standard V Lesson Examples

Beginning with the 2013-2014 school year, NEISD teachers will be required to submit 1 student product that was created using technology. This initiative supports the Standard V requirements as outlined by SBEC.
My El Dorado peeps have been very busy planning with me and wanted to take this opportunity to share some of the projects they will be doing with their students. Many of these app/web tools are cross-curricular and can be applied to different TEKS or units of study. Please contact me if you have an idea for a lesson and need a similar task card to use with your students.
- Kinder Language Arts K.6A identify elements of a story including setting, character and key events: Facetalk Retelling
- 1st Grade Math 1.3 The student applies mathematical process standards to develop and use strategies for whole number addition and subtraction computations in order to solve problems: Farmyard Math
- 1st Grade Language Arts 1.9 A Describe the plot (problem and solution) and retell a story’s beginning, middle, and end with attention to the sequence of events: BME Summaries
- 2nd Grade Science 2.5D Combine materials that when put together can do things that they cannot do by themselves such as building a tower or a bridge and justify the selection of those materials based on their physical properties: Videolicious Structures Project
- 2nd Grade Science 2.5B The student knows that matter has physical properties and those properties determine how it is described, classified, changed, and used. Matter and Energy Digital Story
- 3rd Grade Science 3.8B Describe and illustrate the Sun as a star composed of gases that provides light and heat energy for the water cycle: Thinglink Water Cycle Project-PDF, Thinglink Water Cycle Project-Word 2013
- 3rd Grade Reading SE 3.16 Students use comprehension skills to analyze how words, images, graphics, and sounds work together in various forms to impact meaning. Students will continue to apply earlier standards with greater depth in increasingly more complex texts: Big 6 Research Project-PDF, Big 6 Research Project-Word 2013
- 3rd Grade Math 3.11B: The student directly compares the attributes of length, area, weight/mass, and capacity, and uses comparative language to solve problems and answer questions. Perimeter Party
- 4th Grade History 4.3 The student understands the importance of the Texas Revolution, the Republic of Texas, and the annexation of Texas to the United States: Google Tour Builder
- 5th Grade Science 5.8 Students will understand that weather represents the short term conditions of the atmosphere by producing a video that explains weather patterns of a specific region over a 3 week period: Videolicious Weather Project
- 5th Grade Math 5.6: Patterns, Relationships, & Algebraic Thinking – Words to Symbols : Glogster Word Problem Videos by Lisa Johnson
- 5th Grade Reading 5.6 (B) explain the roles and functions of characters in various plots, including their relationships and conflicts: Read Write Think Character Analysis
Tool of the Month: Book Creator App
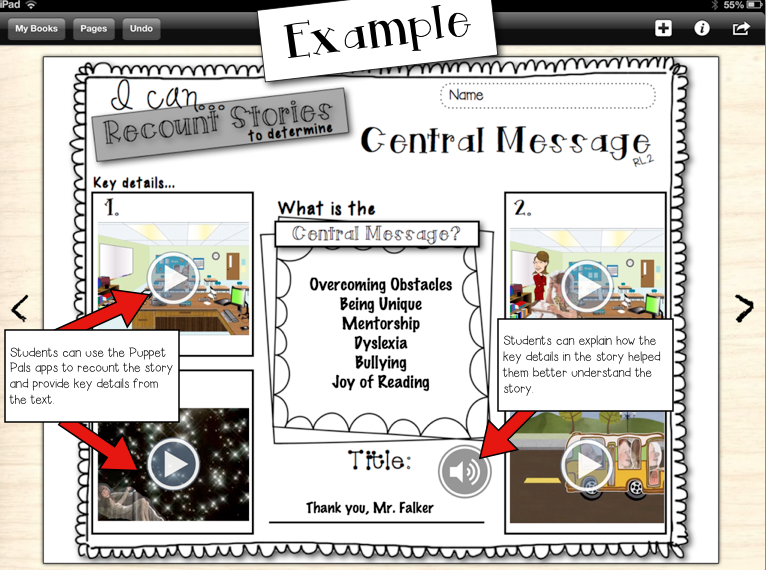
One of my favorite apps for the iPad is Book Creator. It costs $4.99 but they also have a free version that lets you create one free book. There isn’t a limit (as far as I can tell) as to how many pages your one free book can have, so it is possible to use your free book for several different projects. I stumbled upon a wonderful blog post from Tech With Jen where she describes how she uses graphic organizers as the background for student interactive reading journals. This one particular quote really stood out and made me think:
“When students have to write they spend a lot of cognitive energy on composing the message. Because of this, many students tend to choose to write what is easy rather than going deeper. Therefore, why not allow students to record their thinking using video, audio recording, and finding evidence by highlighting text.”
This is the perfect example of how technology can be used to enhance the learning process in a meaningful way. Using graphic organizers is a great way to bridge the gap between what is comfortable and trying something new. Below is a screenshot of one of Jen’s graphic organizers that includes video, audio and text. Notice that she used other video creation apps to summarize and retell events in a story.
There are many free sources where you can find digital versions of graphic organizers:
- Education Place
- Holt Interactive Graphic Organizers
- National Geographic
- Student Handouts
- Educational Technology and Mobile Learning
- Mrs. Hughes’ Place
The easiest way to get the graphic organizer into Book Creator would be to simply take a picture of the printed copy and upload as the background. If you really want to get creative, you could make your own graphic organizers in Pages or PowerPoint and then save as a jpeg. Dropbox or some other cloud storage utility will allow you to import to your camera roll. For more information on using Book Creator, visit their support page or view the video tutorial below.
Geo Greeting for Spelling Practice
Geo Greeting is a neat little tool that allows you to create a message that contains up to 40 characters. It uses satellite images of buildings from all over the world that look like letters. The link it creates can be posted on your blog or emailed. It doesn’t generate an html code for embedding, but you can create a screen recording like the one below (AC/DC background music not included). This would be a fun way for students to practice spelling words. All the links can be submitted using a Google Form. It would also be a great way for primary students to chant word wall words.
VDI Elementary Toolkit
What is a Virtual Desktop Infrastructure (VDI)?
In 2013, all NEISD computer labs were replaced with VDI machines using funds from the 2011 bond program. The biggest change teachers and students need to understand is the user may no longer modify the desktop appearance, including creating desktop shortcuts, saving work to the desktop itself or to the documents folder. Once a user is logged off, the desktop reverts back to a pristine image. The video below explains a VDI environment in detail.
Tips and Tricks for Navigating Through the Environment:
- Web Only Access vs. Campus Hub– Choosing web only access will allow the user to navigate through the web without logging into Active Directory. The user will not have access to district software, personal, or shared directories. However, the user will have printing capabilities if the campus has followed the directions to setup up a printer manually on the thin client itself. Web only access should NOT be the default method that students use because the Firefox browser does not have all of the plugins that many web 2.0 products require to work consistently and effectively. Students and staff will need to select their campus hub if they wish to save work for later use or use district deployed software.
- Logging On/Off– Students and teachers will use the same credentials used for Active Directory. Student login credentials can be accessed through the Employee Portal under Student Privacy Inquiry. *Note- Students can be logged into only 1 machine at a time, and there is no generic login.
- Desktop Applications– All software is located in the My Applications folder on the desktop. Right click on the desktop to access web links such as Gizmos, Google Drive, Library Shortcuts, Scholastic Next Generation (this is the new SRI solution), and Think Through Math. There is also a link to a VDI Resource that provides information about current software features, troubleshooting tips, functionality expectations, and new developments that are on the horizon. Movie Maker and Photo Story are no longer available. See below for some web-based alternatives.
- Printing– Printers are delivered to a user based on where they are physically sitting (according to the hostname of the actual machine itself). This means that if you are sitting in the library, you should only be able to see the library printers. If you are sitting in lab 18, you will only see the printers assigned to lab 18, and so on.
- Maintenance– Please do not update any software or utilities such as Java or Flash. All updates will be handled remotely by Technology Services. The physical upkeep of hardware, microphones, and headphones are a campus responsibility. Purchasing information for new equipment can be found on the Automated Pricing System.
- Saving Work– See directions below for saving work to the home directory. The Student Work Drop Folder that was available in the Novell environment will no longer be maintained. Use Google Docs if you need to save files for collaborative work. This can be accessed by right clicking on the desktop. Click here for more information on using Google Docs.
- Shutting Down Workstations– Units should be powered on using the button on the Thin Client, but should be powered off using the on-screen SHUTDOWN option. DO NOT USE THE POWER BUTTON TO SHUT DOWN THE THIN CLIENT. The only time the power button should be used is if the thin client is frozen and you are unable to power down or restart using the on screen options. VDI units should be powered on Monday mornings and can be left on all week as they do not generate much heat or use much electricity. They should be powered down using on-screen options on Friday afternoons. This allows Technology Services to conduct updates after hours during the week so that instruction is not disrupted.
- Accessing Student Home Directories– When logged in as a staff member, you can access all campus student home directories by going to Computer>(Campus Name)_Students. You can filter for individual students by typing their username in the search field located in the upper right corner.
Beginning of the Year Resources
- VDI Lab Rules and Procedures (Notebook File to be shown in the classroom)
- All About Me Scavenger Hunt – Kidspiration Lesson (K-2)
- Create Your Digital Self – Thinglink Project (3-5)
- Creating a Shared Class Folder in Google Docs
- List of Beginning of the Year Themed Tech Lessons
- NEISD VDI Information Page
Software and Web-Based Tools to Support Instruction
Hover over each image to see a linked tutorial on how to use that program. Many of the resources also include integration ideas. This is a great place to go if you are unfamiliar with our district software, or just need some additional ideas to support your instruction. Please contact your campus ITS if you would like assistance planning your next computer lab lesson.


Rock the Lab
Rock the Lab is a website dedicated to providing students with TEKS-based lessons that follow the NEISD scope and sequence. Each grade level has their own page that contains a lesson for every content area. Teachers have a section of their own with video tutorials on how to create student accounts for various web based tools or log in to district resources like Google Drive and Discovery Education. All lessons can be used in your computer lab.
Lesson Examples
- Microsoft Office- Technology Lapbooking
- Graph Club- The Very Hungry Caterpillar
- Inspiration- Vocabulary Web
- Kidspiration-
- Notebook- Battle of the Alamo Research
- Library Portal- Texas Regions Brochure
- Shapes- Investigations Task Card
- Audacity- Fluency Boot Camp
- Google Docs*- Visual Writing Prompt
- Symbaloo*-
- Read Write Think- Character Analysis Task Card
- Abcya- Water Cycle Fotobabble
- Tackk- Book Summary
- Thinglink*- Water Cycle Task Card
- Study Jams- Area/Perimeter Notebook Lesson
- Class Tools- Post it Labeling Tool
- Pixoral*- Death to Boring Book Reports
- Padlet- Collecting Student Work and Feedback
- Scribble Maps- Google Lit Trips
- Discovery Education*
- Pageorama- Amazon Rain Forest Research
- SFS Kids– Compose, Perform and Conduct Music
- Google Earth Virtual Field Trips (The zooming feature in Google Earth can sometimes be choppy)
* Indicates required student or teacher accounts
Computer Lab Integration Posters
Hang these posters in your computer lab to support higher levels of technology integration required by Standard V. NEISD Google Docs credentials required.
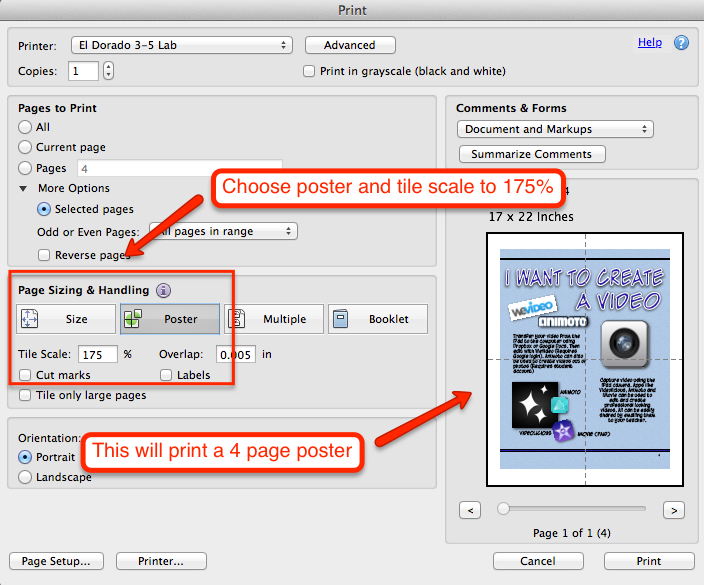
- Posters in PDF Format (See below for directions on how to print)
- QR Code Video Tutorials (coming soon)
- Digital Citizenship Posters
- Block Posters website allows you to upload images and print in poster size
Music iStations @ Bulverde Creek
Amanda Mooris and Chelsea Short from Bulverde Creek Elementary have incorporated iPads in their music stations in an authentic and seamless way. Each station has a focused task that includes a QR code linked to a video tutorial of how to use that particular app. They have a total of 25 minutes with each class, which does not allow for time to demonstrate each station. The students are able to rotate through more stations and have more hands on time with the instruments because of this efficient use of technology. In fact, it inspired me to rethink how I create my task cards that I share with teachers. Instead of a page full of screenshots on how to use the apps, I now include a small QR code in the upper right hand corner that takes them to a video tutorial. You can see an example for Videolicious here. I have a feeling this will not be my last post about these 2 amazing teachers.
October Themed Lessons
(If you are viewing this post from within NEISD, make sure to override Lightspeed so you can see the above video from YouTube)
It’s my FAVORITE time of year again, and I must begin with the best Google Doodle of all time. Kids love to see time-lapse video in action, especially if it contains a spooky ending. I’ve started a collection of several October themed lessons to get your kiddos excited about fall. This list (embedded below) includes a combination of free iPad apps and websites you can use in the computer lab. One lesson I think everyone should check out is the Goosebumps Make Your Own Graphix site on scholastic.com. Students can create their own short graphic novel (comic book) with 10 different layouts to choose from. Be sure to include specific language arts skills you would like your students to include; such as descriptive vocabulary, dialogue, cause and effect, or inferencing. Here is an example they have posted on their site: